I thought it was about time to get started on some projects for Easter since it is one holiday that always seems to creep up on me and I end up making things at the last minute…but not this year!
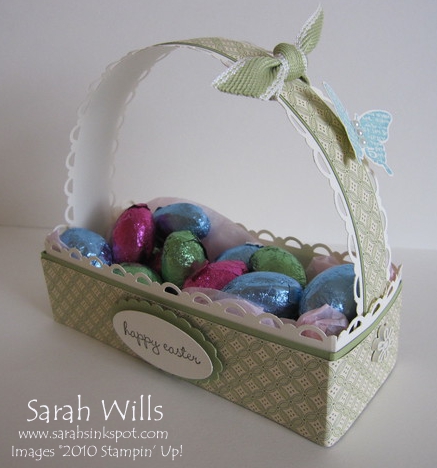
So today I am going to show you a cute Easter Basket that you can make using just one piece of card stock plus patterned papers and embellishments to decorate it…it holds whatever yummy treats you wish and would make a cute gift.
Please read on for details on how to make it plus a link to my free printable tutorial and this week’s blog candy…
I used Very Vanilla for my base and Pear Pizzazz plus a piece of patterned paper from Springtime Vintage DSP to decorate it…
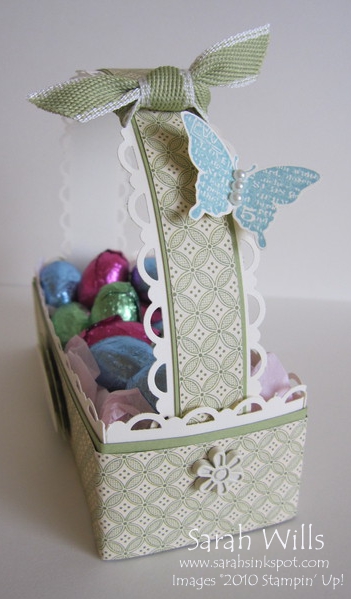
I used my Scallop Trim Border Punch to shape the edges of both my handle and basket and used two cute little Flower Brads in Vanilla (from the Neutrals pack) to secure my handle in place at each end.
Like my cute butterfly? Stamped using a stamp from the FREE Sale-a-bration stamp set Bliss – I cut her out using Paper Snips and added 3 small Pearls down the spine – I added her to my basket handle with a Dimensional so she looks like she is hovering over it…
I also added a piece of Pear Pizzazz 1/2″ Stitched Poly Ribbon to my handle as a finishing touch – I simply sniped a scallop away and tied it around for a nice neat finish.
My sentiment? From the stamp set A Good Egg (pg 48) that I punched out and layered using my Oval & Scallop Oval Punches.
I used a piece of pale pink tissue paper to line my basket and filled it with yummy Hershey foil wrapped eggs – and there is one cute basket of treats!
Do you know what else fits in here nicely? Three of those delicious Cadbury’s Creme Eggs…being an English girl they are my favorite Easter treats…yum!
WANT MY FREE TUTORIAL SO THAT YOU CAN MAKE YOUR OWN CUTE EASTER BASKET? Click HERE to find it in my Project Tutorials section where you will find a printable version too!
Onto this week’s Blog Candy…leave me a comment to let me know what you think of my Easter Basket and you will be entered into a drawing where one lucky winner will be drawn on Friday…
That lucky winner will receive a kit to make one of these Easter Baskets plus a set of 5 hand-stamped note cards made by myself – so be sure to come back Friday and see if you are the winner!
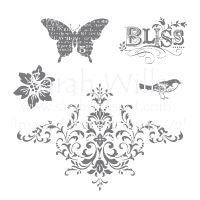
And here are the images included in that Sale-a-bration stamp set Bliss – just one of the stamp sets that you can get for FREE with a $50 purchase right now during Sale-a-bration…
 Want to know more about Sale-a-bration? Click HERE to find out all about it and view the online catalog!
Want a printed copy of the Sale-a-bration Catalog? Simply click here to email me your US mailing address and I will get one out to you FAST – PLUS I’ll include an Occasions Mini Catalog too!
CLICK HERE TO ORDER YOUR STAMPIN’ UP! SUPPLIES ONLINE!


Sarah-
This is absolutely adorable! TFS!
I LOVE the basket, I’m going to make one too! THANKS for sharing Sarah !
Such a sweet little basket! Thanks so much for the tutorial. I will try to make one soon.
I love your basket and thank you so much for the step by step. The colors are awesome and yes I need to get busy on Easter.
Thanks,
pat
This is so cute! I really love the colors the most! So soft yet springy. I shudder at some of the neon colors out! This is basket is something you would be proud to display at home or at the office. Though, at the office, I could never keep enough goodies in it. Thanks for sharing your creativity with us and offering these fun tutorials. Just a card by you would be wonderful to win! Oh, and that punched out edging is the icing on the cake – such a great detail.
This is perfect for my daughter to make for the children she babysits for. She can make it herself and won’t they be thrilled!!!
That is absolutely perfect! I’ve been wanting to come up with something special for some great friends and that is just perfect! Thank you so much for sharing something so great. yolanda-tryingtobecreative.blogspot.com
So cute. I always look forward to Tuesdays!
This is so cute and probably what I’ll be making for our Easter table for each place setting if I can figure it out. I am confused about the way you covered the basket with the solid green strip and the printed sides.
I love the Easter basket! It’s beautiful. My favorite detail is the scallop trim around the entire basket and handle. Great use of so many SU products!
I’d love to win this kit and your handmade cards. I save each and every one of your blog posts! I even copy your project pictures for my “one day” file!
I just found your blog and subscribed a few days ago. I love the basket and your Tuesday tutorial idea. Thanks so much for sharing.
I love this basket, because it is
A. not round
B. rectangular and therefore good for CDs DVDs etc.
C. It is sooo pretty, you did an EXCELLENT job.
:)
Susan
Thanks for another fabulous tutorial, Sarah. Your basket is just darling and looks so festive ~ wouldn’t have to be just for Easter though. Would love to win the kit and cards. Would be darling decorations for showers, parties, anniversary celebrations, weddings, etc. Appreciate another blog candy offer!
Love your basket and thank you so much for the directions.
I agree with you….Easter always seems to sneak up on me too! Now I know I will be ready for the Easter bunny with this adorable basket. I can’t wait to make one of my very own!
Thank you so much for sharing!
June in KS
Hi Gail – there are 2 ways to do this – what I did is this – I cut 1 long strip of card stock sized 11″ x 1 1/4″ and wrapped it around my box with the center point in front & adhered in place – I then cut a smaller piece sized 4 3/4″ x 1 1/4″ to cover my back panel. I then did the same with my strip of DSP but cut it to be 1 2/8″ wide so that my green cardstock shows just above it.
You could also decorate each side panel individually – for the two long panels cut card stock at 4 3/4″ x 1 1/4″ and for the two short panels cut it to be 1 3/4″ x 1 1/4″ – and cut your DSP just a little smaller to mat it on top. Hope that helps!
I love your easter basket, it will be a perfect gift for my nieces and nephews, thanks for sharing. I love getting your email updates and especially love your free tutorials. You rock!!
Love your blog. I check it daily. The easter basket is great. Your tutorials are awesome.
Thanks for the chance to win.
Another great project! I can’t wait to make this adorable basket. Thanks for sharing!
Love the basket. Perfect timing as I was trying to think of projects for an Easter class. Thanks so much for the tutorial
That is adorable Sarah! Might make these for the kids at church.
Your basket is lovely! The blue butterfly on the handle adds a beautiful touch.
Love the basket, thanks for sharing the tutorial. Blessings, LM
I think your Easter basket is soooooooooooo lovely. I love the colors and all the little detail that make it a real piece of art. I have bookmarked your tutorial and will get down to making one too.
Pingback: ColorLab 38 | Stampin' on the Fly