We have some wonderful friends who gave our girls a seed bird feeder…the girls LOVE watching the birds and so this was perfect for them…the only thing we had to do was to find something to hang it on…
We live on a heavily wooded lot and so decided to make a rustic one using all natural materials so that it would blend in – you can see a photo & find out more at the end of this post – and after we had finished it, I got inspiration for making a card with a rustic bird theme…
Here is my cute card that uses sweet bird images featured in the stamp set For the Birds – that set features 7 different cute bird images and I love em all!
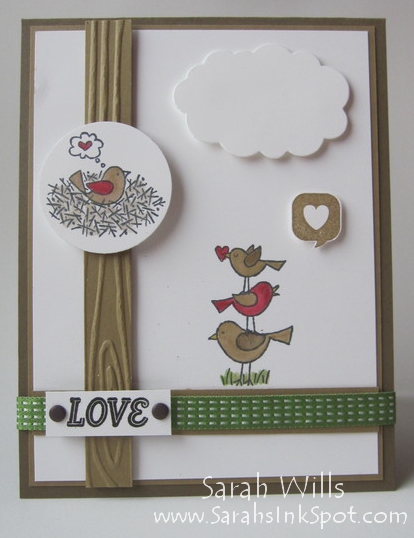
The card base…is Soft Suede onto which I layered a piece of Baked Brown Sugar and then a layer of Whisper White…
The stack of birds…is a stamp from For the Birds that I stamped directly onto the white layer using Stazon Black Ink – I used Soft Suede, Baked Brown Sugar & Cherry Cobbler Ink Pads and a Blender Pen to apply color to those cute birds and Gumball Green for the grass – simply dab the Blender Pen onto your ink pad and then use it to color in your images – it gives you a much softer look than Markers…
The bird in the nest…is another stamp from For the Birds that I colored using the same colors plus a little Crumb Cake Ink for the nest…cutting him out was fun as I got to use some of my favorite toys – I mean tools! – to do it – I used my Big Shot, Magnetic Plate & a die from Circles Collection Framelits (pg 186)…
SARAH’S NOTE: Circles Collection Framelits are a fabulous set of dies to have in your stash – you get TEN circle layering dies in the set for JUST $26.95 – that makes them just $2.70 each – WAY cheaper than buying 10 separate punches! And because they nest, they make it a breeze to make layered projects – you can find them online by clicking HERE
AND another great thing about them is how easy it is to select the correct die for your stamped image…simply take a die or two that you think might work and hold it over your image as I did below – then you can select the perfect size for your image…
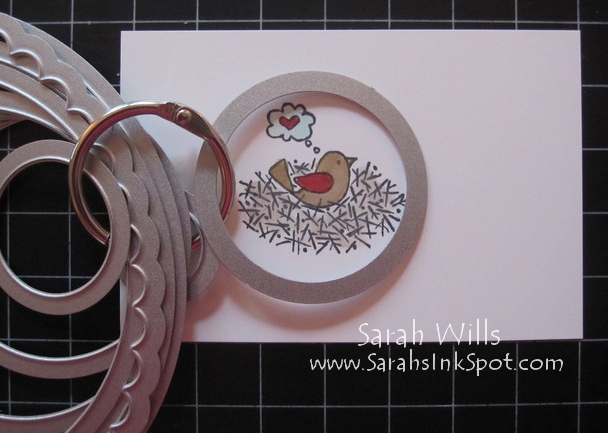
See how I store my framelits on that book ring? I do it for all of my framelits for several reasons – it keeps them all safely in one place so that I don’t lose them and my cat can’t run off with them (yes, she has in the past – I still cannot find a banner framelit that she took a year ago LOL!!!) – and storing them like this makes it really easy to grab them and take them over to my work bench to select the size I want when cutting out a stamped image as above…
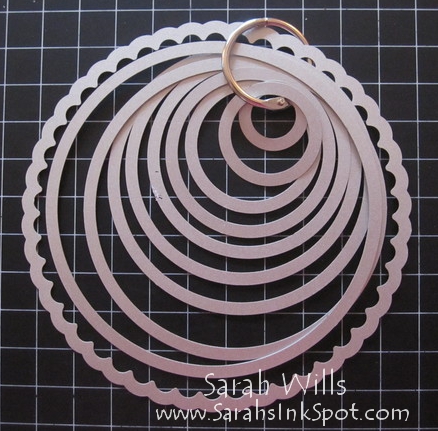
AND (this is my favorite bit!) it allows me to store them ALL in one place where I know they cannot go anywhere and I can see exactly what I have at a glance…I store all of my framelits on a metal magnetic board that I found at Ikea – the board is called Spontan and you can find it here
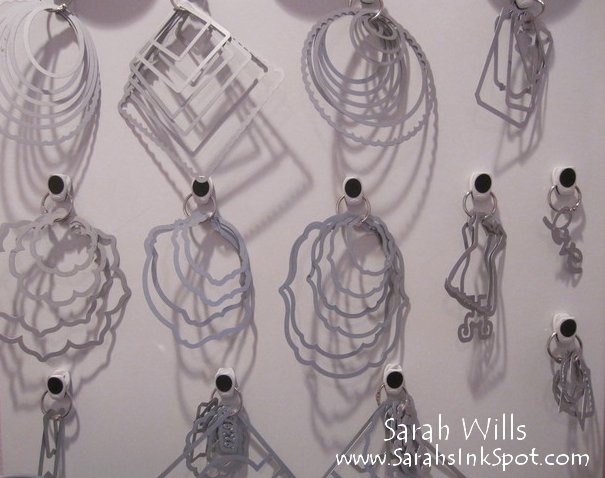
What do I use to attach them to the board? I found these super cool little OXO Good Grips Magnetic Mini Clips that are the perfect thing for the job (I found them here)…they clip hold of the book ring and have a little strong magnet on the back to attach to the board – LOVE them – you simply leave them in place and unclip the ring when you want to use a set of dies!
Enough about my storage solutions LOL and back to my card…
The rustic pole…is made using the Woodgrain Embossing Folder and I attached my nesting bird onto it using dimensionals…
The cloud…isn’t that cute? And so easy to make using a piece of white cardstock and that fab cloud shaped die from Word Bubbles Framelits (pg 36 Occasions Catalog)…
The ribbon…I decided to continue the grass theme by laying a piece of Gumball Green 3/8″ Stitched Satin Ribbon over a strip of Soft Suede cardstock…
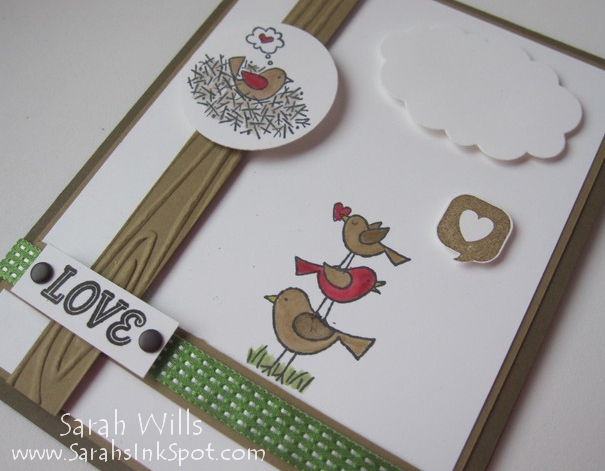
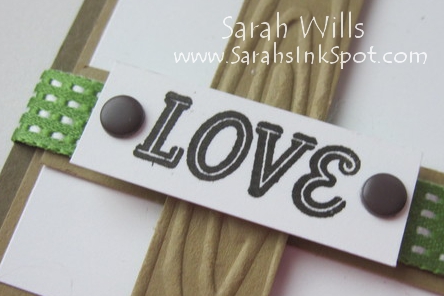
The sentiment…is made using a stamp that I received in this January’s Paper Pumpkin Kit from a set called Love Notes – I stamped it using Early Espresso Ink and added a Candy Dot from the Neutrals Collection at each end, to make it look like a sign…I love that these dots have adhesive already applied making them quick & easy to use…
The finishing touch…it needed a little something else and I found the perfect thing – another stamp in Love Notes which is a speech bubble with a little heart in the center – isn’t that a cute touch?
Here are the images featured in the set For the Birds – click on the blue words to view the set in the online store:
- 126407 For the Birds Clear Mount – $24.95
- 132001 For the Birds Wood Mount – $32.95
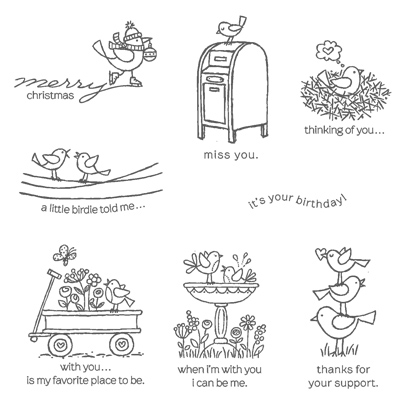
Those stamps are all adorable – so much so that my girls love to use them too!!!
Supplies used to make this card:
Cardstocks: Whisper White (100730), Baked Brown Sugar (131296), Soft Suede (115318)
Stamps: For the Birds (CM 126407/WM 132001), Love Notes (Paper Pumpkin Jan 2014)
Ink: Stazon Black (101406), Early Espresso (126974), Cherry Cobbler (126966), Soft Suede (126978), Baked Brown Sugar (131174)
Die Cutting: Circles Collection Framelits (130911), Word Bubbles Framelits Dies (132968), Magnetic Platform (130658), Big Shot (113439),
Embossing: Woodgrain Embossing Folder (127821)
Ribbon: Gumball Green 3/8″ Stitched Satin (126848)
Misc: Dimensionals (104430), Blender Pen (102845), Neutrals Candy Dots (130934)
CLICK HERE TO ORDER YOUR STAMPIN UP SUPPLIES ONLINE!

So back to the inspiration for today’s card…our home made bird feeding pole! We wanted a rustic looking feeding station so that it would blend into the woodland at the back of the house and we wanted to see if we could use all natural materials…
We have some piles of wood spread over the lot where the previous owner did some tree felling and so we decided to do a scavenger hunt and see what we could come up with…
We managed to source the perfect materials for the job and this is how it turned out…click on the photo below for a larger view…
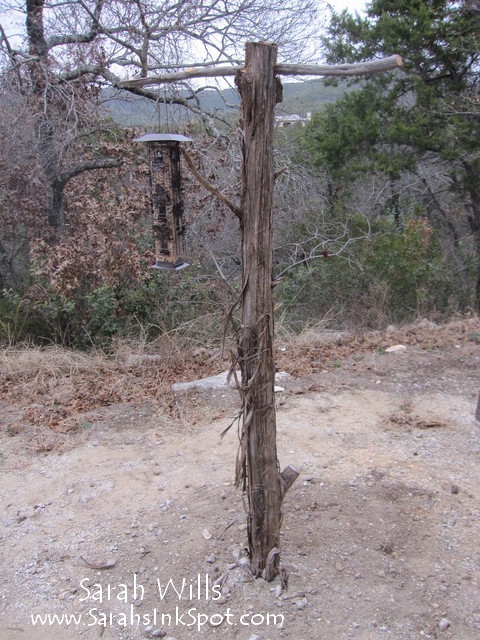
I think that my hubby did a fabulous job making this and that we will enjoy it for years to come – I only hope that it doesn’t look like a scarecrow to the birds and scare them away LOL!!! I’ll keep you updated when they start using it with photos of what we see…
What a great card.
And thanks for the storage tips. I have been looking at ways to store my dies so this was FANTASTIC, as helped me heaps. Many thanks.
Sarah, love how you store your dies. I have a magnetic cartridge for my old Xyron laminator machine. I run the 8.5×11 chipboards that come in some of the card kits through and punch holes. I put them in a binder and have them labeled. I can usually get two to four sets on a page depending on size and shape.