Here is one cute little Carton Box that you can theme for any occasion – mine below is for Valentine’s Day – and it is a great size to hold lots of treats…
It would also be perfect for shower and party favors…you could also package cookies into it and make a window into the front panel too – such a versatile little box!

This sweet box is made from just one piece of cardstock plus papers and embellishments to decorate it with and it is held closed by a piece of ribbon at the very top.
The actual box section where you put the goodies measures 3″ wide, 2 1/4″ deep and 3 1/2″ high – meaning lots of room for treats!
Here is my tutorial so that you can make your own Carton Gift Box – at the end of this tutorial you will find a printable version too so that you can print it out and keep it for reference.
Take a sheet of 8 1/2″ x 11″ cardstock…

And place into your Score Tool or Paper Trimmer with the score blade inserted – with the longest edge along the top – and make score lines at 1/2″, 3 1/2″, 5 3/4″ and 8 3/4″…

Turn the cardstock around so that the shorter edge is along the top and make scores lines at 3″ and 6 1/2″…

Turn back around so that you have the longest edge at the top. Now using your Paper Trimmer make 8 cuts – 4 on each side – from the edge to the intersecting score line – and this is what it should look like…

At the end where you have the 1/2″ strip cut away the two outer strips leaving the center one intact – this tab will become the strip that holds your box together.

Fold along the score lines…

Apply a very strong adhesive tape such as Sticky Strip to the small tab that remains on the end…but DO NOT remove the backing paper as you are not ready to assemble the box just yet…

Turn your cardstock over and apply Sticky Strip to the following panels – again, do not remove the backing paper just yet. This is what you should have…

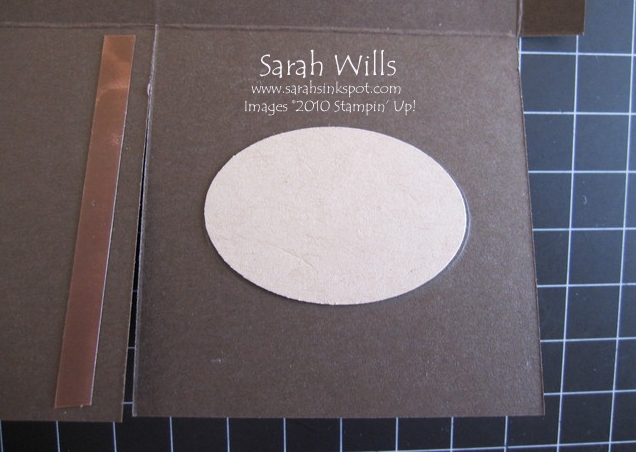
Next you need to make your handles – I chose to use my 2″ x 1 3/8″ Oval Punch (formerly known as the Wide Oval Punch) but you could use any shape that you wish…I punched 3/4″ in from my outside edge.
To get perfect placement I punched out an oval from scrap paper and positioned it on my flap – I drew around it with pencil and then used this shape as a guideline for my punch.

And now to assemble…peel the backing off of the Sticky Strip that you put onto the tab, fold your box over and adhere this tab to the inside of your box…

Turn your box so that the top faces you (the end with the punched ovals) and open those flaps out…

Remove the backing from the Sticky Strip on one of the panels – push this panel inside your box and adhere to the inside wall – this reinforces the walls to give you a very sturdy box…

And repeat for the other flap…and this is what your box will look like…

Now remove the Sticky Strip from the bottom two panels – fold the 2 smaller panels in and cover them with the two larger ones that have Sticky Strip on them…

Turn your box over and if you wish to do so, use a Corner Rounding Punch to trim the corners of the two top flaps – this gives a very neat and professional finish…

How to secure the top? Make two holes on each top flap – you are going to thread ribbon through these so choose a hole punch depending on the width of your ribbon – I am using Seam Binding and so used a 1/8″ Circle Punch for mine.

Decorate your outer box panels as wished and once you have filled your box with goodies, thread through your ribbon and tie in a bow – and voila – one cute and beautiful Carton Gift Box!

For my carton I used Early Espresso cardstock for the box base – I used the red color Cherry Cobbler for my accent cardstock & Seam Binding ribbon and even found co-ordinating tissue paper for the inside of my box – it fits my color scheme beautifully and I picked it up at Target…
I punched my hearts using the Heart to Heart Punch and see that pretty dotted paper? From the Love Letter pack of Designer Series Paper that can be found on pg 173 of the Catalog…there are lots of beautiful patterns in there!

My sentiment is a stamp from the set XOXO featured on pg 6 of the Occasions Mini Catalog and is punched out using the 1 3/8″ Circle Punch & Scallop Circle Punch…I also used my Scallop Edge Border Punch to create a cute border…

WANT TO PRINT OUT THIS TUTORIAL? PLEASE CLICK HERE FOR A PRINTABLE VERSION WHICH WILL OPEN IN A NEW BROWSER WINDOW!
Please click HERE to view my other Project Tutorials