This is a beautiful little scrapbook album featuring pages and pockets for you to decorate, embellish and add photographs to…
And believe it or not, all you need to make the base album are 5 envelopes and a piece of cardstock for the cover – that’s it! Each page also features a pocket into which you can slide pages or mementos of a trip…this is a cute and very affordable-to-make keepsake…

This is the front cover of mine…

I used patterned papers from the Springtime Vintage pack that you can find on pg 15 of the Occasions Mini Catalog along with new beautiful Baja Breeze Seam Binding featured on pg 16.
Here is my tutorial so that you can make your own Envelope Scrapbook Album – at the end of this tutorial you will find a printable version too so that you can print it out and keep it for reference.
First to make the inner pages…
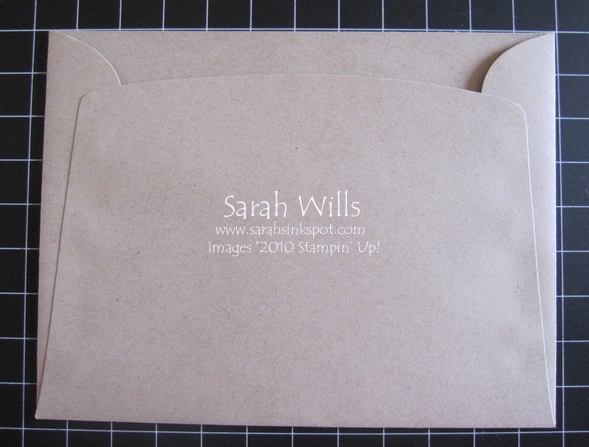
Take 5 high quality envelopes – you can find Stampin’ Up!’s Envelopes on pg 171 of the catalog or by clicking here – I used the Medium Crumb Cake envelopes because I wanted to give my album a Kraft look…

And then use your Paper Trimmer to cut the flaps off of your 5 envelopes like so…

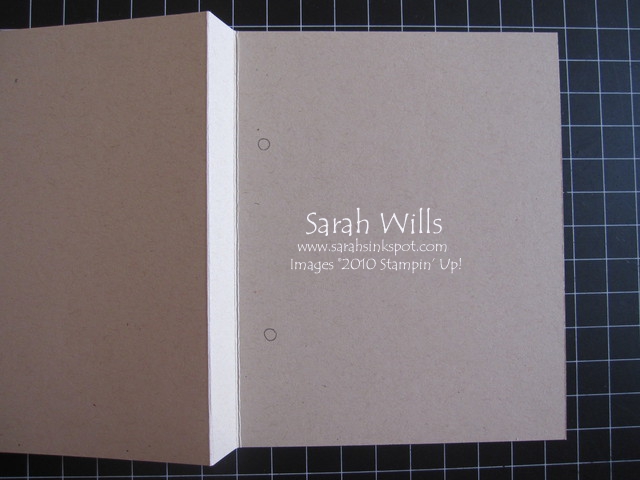
And then using your Score Tool or Paper Trimmer with Score Blade inserted, measure 1/2″ in from the bottom edge (the opposite edge to the one that had the flap attached) and score down the length of the envelope.
This will become the spine of your scrapbook and the opening will be on the opposite side like so…

Next fold along each score line back and forth, to make an easy to turn page…

Now to make the outer cover…
Cut a piece of card stock in the color of your choice to be 6″ x 9 1/2″…I used Crumb Cake, the same color as my envelopes…

And place into your Score Tool or Paper Trimmer with Score Blade with the longest edge along the top. Score at 4″ and 4 3/4″…

And fold as shown below – this is your album cover and the smallest part in the center will cover the spine of the envelopes.

Now to assemble your album…
Stack your 5 envelopes on top of one another and make two holes in the spine section…if you use a Crop-a-dile to do this, it cuts through your stack with great ease – if you are using a regular 1/8″ Hole Punch you may need to punch these holes in each envelope individually…

Take your cover and using one of your envelopes as a template, use a pencil to mark where you need to punch the holes on the back cover and on the spine area on the front cover…and then punch them out.

Gather together your cover, your first envelope and a roll of ribbon…

Place the envelope face down onto the back cover and cut a long length of ribbon – thread this through the back cover and up through the top hole…until you have pulled through approximately half of your length of ribbon, leaving the remainder behind the back cover…
If you wish to add extra security to keep your finished pages snugly together, you do so at this stage – you can apply a piece of strong adhesive tape such as Sticky Strip to the spine section of each envelope, adhering them as you add another on top – this firmly keeps them together.

Add the second envelope and thread the ribbon through it’s top hole…and then continue for the next three envelopes…when you have thread them all onto the ribbon, thread if through the top cover…

Turn your album over and find the remaining length of ribbon – thread through the bottom hole of the back cover…

And then through the bottom hole of each of the envelopes, working your way towards the front cover…

And when you reach the front, thread through the bottom hole…
If you have been applying Sticky Strip to your envelope spines, add the final strips here and close the cover firmly down onto the spine. Another way to secure your pages is to use a stapler which you do at this stage – before tying your top cover in place, simply staple the envelopes together and then close your cover…


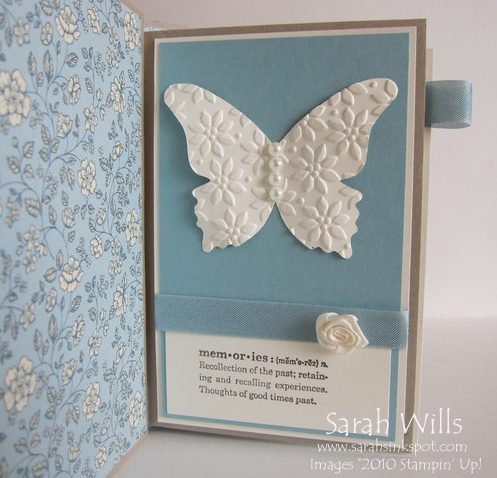
And this is what you will see when you open your top cover…a blank album ready for decorating and filling with precious memories…

Decorating your album…
This little album gives you the front & back inner and outer covers to decorate with card stocks & papers and also LOTS of pages…in fact 20 in total!
Each side of the envelope can be used meaning you have 10 little pages that you can decorate – I cut papers 5 1/2″ x 3 1/2″ to decorate my pages – and then you embellish as wished.
You can also add 5 inserts to pull out of the envelopes – these could be single or double sided giving you 5 or 10 more surfaces to use – you could use mementos of a trip/event.
I made pages that pull out using Ribbon tabs – I taped on a ribbon loop underneath my decorative papers so that the ends are hidden from view.
How did I make my inserts? I used three 5 1/4″ x 4″ inserts to make regular shaped pages and two Top Note die cut inserts for fancy pages.
Here is one of my regular pages that slides out from it’s envelope…

And here is one of my Top Note pages…Top Note die cuts fit beautifully into the envelopes…

I love how mine turned out and hope you have lots of fun making yours – I’d love to see your creations so please email them to me!
WANT TO PRINT OUT THIS TUTORIAL? PLEASE CLICK HERE FOR A PRINTABLE VERSION WHICH WILL OPEN IN A NEW BROWSER WINDOW!
Please click HERE to view my other Project Tutorials
Pingback: Top Score Scrapbooking | scrapbooking
Pingback: Scrapbook Paper Envelope Template | The Scrapbook Idea
Pingback: Scrapbook Ideas With Envelopes | The Scrapbook Idea
Loved it, cannot wait to try it. Lovely colors and I love butterflies. Thanks for sharing.
Love This~!
Love this. My friend is going away for a special holiday and want to give her something for her keepsakes and memories. Thank you x
Love the pattern and your tutorial is one of the best around. Thanks for taking the time to share it. xx
This is so lovely. Being as catalogues change over time I can’t find the envelopes you reference. Are they the same size as the Very Vanilla Medium Envelopes? ie 5-3/4″ x 4-3/8″
Yes, they are the same size :-)
Thank you for the tutorial and for the print out.
Awesome! Awesome! Awesome! Thank you for sharing.