These Mugs are filled with treats and are so fun to make – they use just one sheet of cardstock, some Designer Series Papers and embellishments and then you fill them with yummy treats…
I came across the template on the demonstrator-only part of the Stampin’ Up! website and knew as soon as I saw it that I wanted to make some of these cute mugs to share with you…please read on for details of how I made them plus you will find a link at the end for a printable version of this tutorial.
Firstly choose the color of cardstock for your base and cut it to be 8 3/8″ x 3 1/2″…

Use a scoring tool or your paper trimmer with score blade inserted and score at 1″, 2″, 3″, 4″, 5″, 6″, 7″ and 8″…

At this point you can choose to leave your cardstock blank or cover it with some patterned paper – if you choose to use patterned paper then cut it to size (I cut mine at 8 3/8″ x 3 1/4″) and score as above…using strong adhesive adhere the two together.

Next you need to decide on what panel you want your handle inserted into – I chose the third panel from one end…measure down 1/2″ from the top and make a pencil mark – measure down a further 1/4″ and make another pencil mark – using a craft knife make a slit – this is your first slot. Then measure down 1 1/8″ from the bottom of your slot and make another slot 1/4″ long…your handle will fit nicely into here.

Fold along all score lines and apply Sticky Strip to the smallest end panel…

And adhere to make a cylinder like so…

Next you need to make your base and handle…the easiest way to do this is to print out the template directly onto the cardstock you are using – you can find the template by clicking HERE – it will open in a new browser window and is a full-scale .pdf file
Print out the template onto your cardstock and cut out your circle – I used my Circle Scissors Plus to cut out mine and used the 3 1/8″ slot to do it…if you don’t have a circle cutting tool, you can do this by hand – it is all hidden inside the mug so doesn’t matter if it isnt super neat…
Then using sharp Paper Snips cut down each solid line and score along the broken lines…

Push the base down into your cylinder and adhere each flap using strong adhesive – I like to use Sticky Strip.
Now to make your handle…take your cardstock that the template is printed onto and trim out the handle part…

Fold the cardstock in half where both half moons meet – where the broken line is…

Next take a 1 3/4″ Circle Punch (or Paper Snips if you don’t have one) and position your punch as follows – look at the bottom edge of mine below – you want to position your punch so that the broken line part stays intact so get it as close to the edge as you can – the closer you can get, the rounder your handle will look…

And this is what you will have…

Next use a 1 1/4″ Circle Punch to punch out the inner part on each side (or Paper Snips if you don’t have that punch) and turn it over so that the guidelines will be on the inside…

Take your mug base and find the slots that you made for your handle…

Gently insert each end of the handle into the slots and fold each out inside and secure with tape…and there you have your finished mug ready for embellishing…

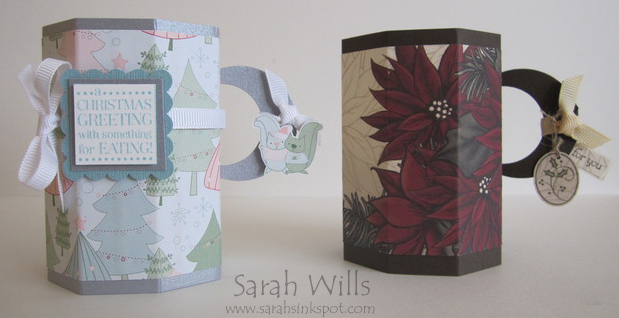
This is how I decorated one of mine – it uses papers from Candy Cane Christmas featured in the Holiday Mini and see those cute squirrels? I cut them out of one of the sheets in that pack…I also used 1/4″ Grosgrain Ribbon in Whisper White and the sentiment is from the set Tags til Christmas also in the Holiday Mini…the punch I used is the Scallop Square and I filled my mug with Hershey’s Raspberry Kisses…cute, eh?

Another mug I made but this time with an elegant look…it is decorated using papers from Deck the Halls in the Holiday Mini Catalog, Vanilla 1/4″ Grosgrain Ribbon and tags I made that I attached using Linen Thread…this one I filled with a Biscotti, a Starbucks Gift Card and some Hershey Nuggets that I covered with papers from that to make them look extra special…

I would LOVE to see your creations using this template – if you email them to me I will feature them on my blog…
WANT TO PRINT OUT THIS TUTORIAL? PLEASE CLICK HERE FOR A PRINTABLE VERSION WHICH WILL OPEN IN A NEW BROWSER WINDOW
Please click HERE to view my other Project Tutorials