Did you enjoy the Blog Hop? Weren’t there some fabulous ideas of what you can do with those wonderful products in the brand new Occasions Mini Catalog?
In this post I have details of how I made my projects along with close up photos and a tutorial for the Tri-Shutter card…and of course I announce the Blog Hop Candy Winner…
I just LOVE the stamp set I got to work with – With All My Heart – which can be found on pg 12 of the Occasions Mini. It co-ordinates with the following punches to make using it super easy and quick to stamp your images and get them trimmed out in beautiful shapes: Extra Large Fancy Flower which you can find in the Occasions Mini, and the following from the main catalog – Flower Trio, Heart to Heart, Modern Label, Wide Oval, Large Oval and Scallop Oval…
My first project is very girly and uses my favorite Chocolate Chip…this time of year I cannot help but pair it up with Regal Rose and Pretty in Pink as it just reminds me of Valentine’s…this card also has a bit of a circle theme and I used some DSP from the fabulous value for money Sweet Pea DSP Stack that you can find in the Occasions Mini…you get 48 sheets of double sided DSP for only $24.95…what a bargain and I think that the paper suits this card sooo well…
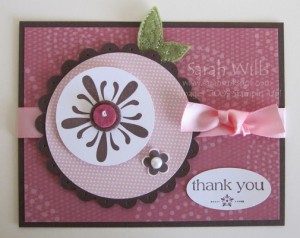
The cardbase is Chocolate Chip onto which is layered a piece of DSP from the Sweet Pea stack and around it is tied a piece of Pretty in Pink Satin Ribbon also available in the Occasions Mini finished with a knot – it adds a real touch of luxury. I then cut a scallop circle from Chocolate Chip using my Big Shot and Scallop Circle #2 Die and used my Paper Piercing Tool to put holes around the edge. I used my Circle Scissors Plus to cut a circle out of another piece of Sweet Pea DSP and layered it on top – I attached this to the card base and added a cute leaf from the Sweet Pea Stitched Felt pack.
I took a flower stamp from With All My Heart and using Chocolate Chip Ink stamped it onto White cardstock and cut it out using my Circle Scissors Plus – I used Dimensionals to attach it and added a felt decal to the center. I stamped the small flower and cut it out and then attached a Half Pearl from the Pretties Kit. Finally I stamped my sentiment and punched it out using my Large Oval Punch.
Moving on to my second project…I wanted to show you something completely different and when I came across these miniature Bath & Body Works products I put my thinking cap on to find a way to package them up to give as a gift and to challenge myself to use colors other than pinks…
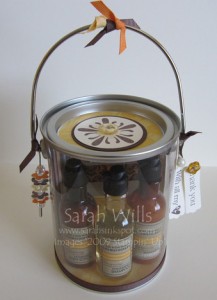
I found this clear paint can in my craft closet and figured it would be just perfect for this project – I used papers from the Sweet Pea Stack both inside the tin as a backdrop, on the bottom and on the top of the lid…
For a backdrop I cut some sheets of DSP that match my products and attached it to the back and the bottom of the can. I added a bottle of shampoo, conditioner, lotion and bar soap which I secured with mini glue dots to hold them in place – and an herbal tea bag in the bag to add a relaxing touch.
To decorate the outside of the can…I attached a piece of 1/4″ Chocolate Chip Grosgrain Ribbon to the bottom rim…I cut a piece of DSP using my Circle Scissors Plus to adhere to the top of the tin and added a stamped flower that has a button from Button Latte in the center with some linen thread tied on it as a finishing touch – I matted it onto a Chocolate Chip circle and adhered it to the lid.
Can you see where I used the stamps from With All My Heart? The obvious place is on the lid and the sentiment tags on the side…but did you see the charm on the other side? I used a hat pin and beads from the Pretties Kit and interlaced them with small flowers that I stamped in brown, orange and yellow and punched out using the Flower Trio Punch…it looks sooo cute…
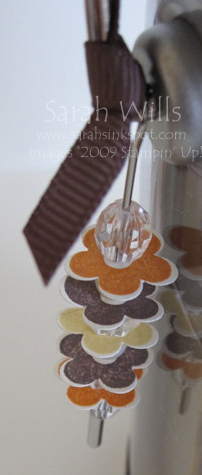
On the other side I stamped my sentiments onto Very Vanilla and punched them out using the Modern Label punch. I then added a button and pearl and attached all to the can using Linen Thread. As a finishing touch I added some co-ordinating ribbons…what a cool gift…
Onto my third project…I have the very talented Mum of my friend to thank for inspiring me (thank you Jean!) – I have never made a tri-shutter card before and she made me want to try…so here is my version…
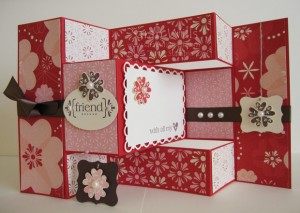
Now it does use alot of DSP from the Sending Love Specialty pack featured in the Occasions Mini – aren’t those papers just gorgeous? Hence I couldnt resist using them as they co-ordinate sooo well with my set…I did get my stamps in there too and tried to use them in an interesting and ‘think out of the box’ way…
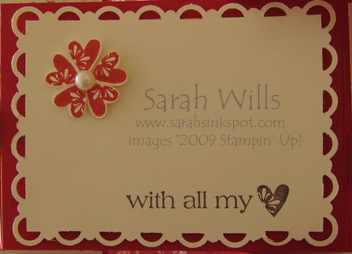
I used the ‘friend’ sentiment which I punched out using my Wide Oval Punch…I added a couple of Pink Micro Beads to each end for a cool little feature…and I also used the ‘with all my heart’ sentiment – and check out those flowers…can you see how I made ’em? I used that little heart at the end of the ‘with all my heart’ sentiment that you can see below…
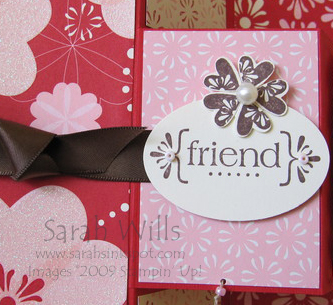

I stamped it onto vanilla cardstock using my inks and I punched the hearts out using my Heart to Heart punch (the little heart shape punch fits perfectly) and made them into flowers with a half pearl in each center – they turned out so cute.
And looky looky…do you see the mat in the center of the card? Do you know how I made it? With two brand new co-ordinating punches that make it sooo easy to produce a beautiful accent – you can find the Scallop Trim Corner Punch in the Occasions Mini and it’s co-ordinating Scallop Border Punch in the Sale-a-bration Catalog – you can get that gorgeous border punch for free with a $50 purchase from January 5th when Sale-a-bration begins!
I also used my Curly Label Punch to make some embellies that I tied on using Linen Thread…and I just couldnt resist using some of the new Chocolate Chip 5/8″ Satin Ribbon as a finishing touch.
Want the Tutorial for this Tri-Shutter card? You can find it by clicking HERE…
Onto my fourth and final project…what can I say? I am a pink and brown girl at heart and I couldn’t resist using those colors one more time…but I wanted to make a card that is a little bit different to give you another idea and this one has some cute embellished paper clips that the lucky recipient can use as bookmarks or in their office once they are no longer displaying the card…
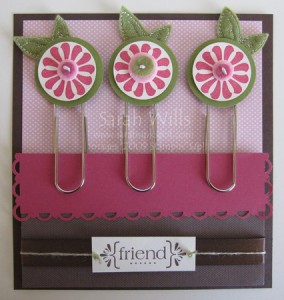
The base of the card is a 6″ x 6″ piece of Chocolate Chip cardstock onto which I layered a piece of polka dot pink DSP from Sweet Pea. To make the ‘flower pot’ I took a piece of brown DSP from Sweet Pea and…looky looky at the top…isn’t it cute? It uses two brand new punches…I took a piece of Regal Rose cardstock and used the brand new Scallop Trim Corner punch from the Occasions Mini and the Scallop Trim Border Punch from the Sale-a-bration Catalog. I adhered this onto the flower pot base and attached a piece of Chocolate Chip Satin Ribbon to it – I stamped the sentiment and trimmed it out and attached linen thread and Green Micro Beads to it and adhered it in place.
For the paperclips…I found them at a national big box store and I stamped the flower in Regal Rose onto Very Vanilla, punched them out and layered them onto Old Olive Circles…in the center of each flower is a felt accent from Sweet Pea Stitched Felt and I also attached some leaves from that pack to each edge. I used Pop-up Glue Dots to stick the flowers to the paper clips and slid them onto the flower pot – and there you have a very cute and practical card with a difference…
Onto the winner of my Blog Hop Candy…she will receive a Red Coffee Mug filled with Hershey’s Kisses along with a pack of Sweet Treats Cups…the number has been drawn using a random generator…and the winner is…Comment no. 74…
Karen – it is hard to choose because each project has a special, creative touch that makes it stand out in some unique way. However, I do like to win things, so I will pick just one in order to enter the contest…the tri-fold shutter card. It beautifully displays paper, stamps, and embellishments. Great job, Sarah!
A big congrats Karen – enjoy your goodies – Karen liked the Tri-Shutter card the best so will be receiving that as well! It was the most popular of my projects and you can make your own version – click here to visit my Tutorial to create one of these beauties for yourself…
Remember to come back tomorrow for Launch Day of the Occasions Mini Catalog and Sale-a-bration…I’ll have lots of details about the brand new products and info about how Sale-a-bration works and what you can get for FREE!
Great projects! Just “hopping” now but enjoying all the stops! TFS!