Welcome back to my Blog Hop Post – below you will find more photographs, details and how to’s for my items featured this past weekend. The fabulous brand new Holiday Mini is now available – you can order from it now and you can view the online catalog by clicking HERE – you can also place an order directly online by clicking on my 24 Hour Shopping button to the right.
The stamp set from the Holiday Mini that I used for the Blog Hop was Pumpkin Patch – it is a set of 11 stamps and you can find it on pg 9 of the Holiday Mini Catalog –
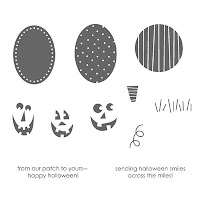 I love versatile sets that I can use for more than one occasion and when I first saw this set I knew it had potential…if you are on a budget this coming Holiday season then this is the set for you – out of one stamp set costing just $22.95 you have all the stamps you need to produce projects for Halloween, Thanksgiving and Christmas…my little creations are below :-)
Elegant Halloween Treats…

I wanted to create ‘grown up’ Halloween treats that would be perfect for teachers, work colleagues & friends and came up with a gift set containing Cocoa and Hershey’s Nuggets – can you tell I like chocolate? :-)
The Nugget Box is sooo easy to make and is made completely out of Cast-a-Spell DSP – the little drawer slides out to reveal 3 nuggets – what a yummy treat in a cute holder :-)
 I used the same DSP and jack-o-lantern to decorate the top of the box to continue the theme of my card as I am giving them together as a gift package, and I used 1/4″ Pumpkin Pie Grosgrain. I stamped the faces onto bits of DSP measuring 1″ x 3 1/4″ and using Sticky Strip adhered them to the nuggets. You can find the tutorial to make the Nugget Box by clicking HERE – you need to use a strong adhesive to stick the box flaps down – I would definitely recommend Sticky Strip :-)
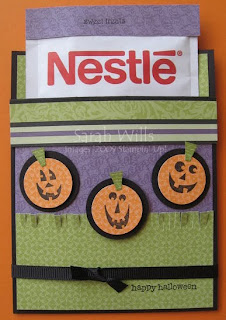
The Cocoa Card – take a piece of Basic Black cardstock and cut lengthways in half to give 2 pieces that each measure 4 1/4″ x 11″. Score at 5 1/2″ and again at 10″ and fold along the score lines. Use a very strong adhesive tape – I used Sticky Strip – to tape down both sides to create the pouch which holds the cocoa sachet and tape the little flap down, then decorate – I used Cast-a-Spell DSP and 1/4″ Black Grosgrain ribbon – and I also used a little piece of purple DSP to cover the top of the cocoa pouch which looks much cuter than just popping the white sachet in there. I used my Paper Snips to trim the edge of green DSP to create ‘grass’. I stamped the jack-o-lantern faces onto orange DSP and punched them out using my 3/4″ Circle Punch – I punched out a black 1″ Circle and adhered the pumpkin face to it with a dimensional so that it pops off of the card front – it turned out sooo cute :-)
The two sentiment stamps I used on this card are from the fabulous set ‘Teeny Tiny Wishes’ that you can find on pg 145 of the catalog – I LOVE this set – there are 24 sentiments in there which cover almost all occasions during the year – it is just fabulous value for money and since purchasing it, I have used it for almost every card I have made.

I was trying to think of different ways to package candy for kids using this stamp set and came up with a couple of cute ones…and I love that the pot can be used after the holiday…
The Flower Pot – I painted a pot that I found at the craft store using orange acrylic paint and used Black Stazon Ink to stamp the face. I took a treat bag and put a twist into the end of it and secured it using tape. I then filled the bag with candy and sealed it at the bottom. I placed this into the pot and twisted a pipe cleaner around my taped twist at the top, attached leaves and used a sentiment from Teeny Tiny Wishes that I made into a tag using my Circle Punches which I then tied on with raffia. I will also attach a pumpkin seed in a decorated envelope so that once the candy has been eaten, the child can fill the pot with soil and see how their seed grows :-)
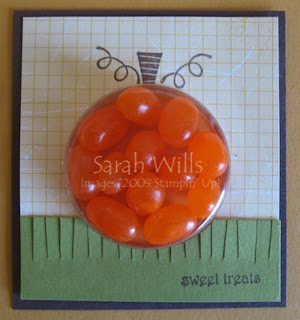
Jelly Bean Sweet Treats – I think this would be perfect for kids and adults alike – isn’t it cool? The clear container that you see on the front is a brand new product – Sweet Treats Cups that you can find on pg 7 of the Holiday Mini Catalog – there is a co-ordinating stamp set – Sweet Centers – that you can use with them for projects all year round as it contains stamps for valentines, halloween, Christmas and also stamps to make a hot air balloon and flower petal and leaf stamps – how versatile is that?!
Fall Colors Flower Birthday Card…
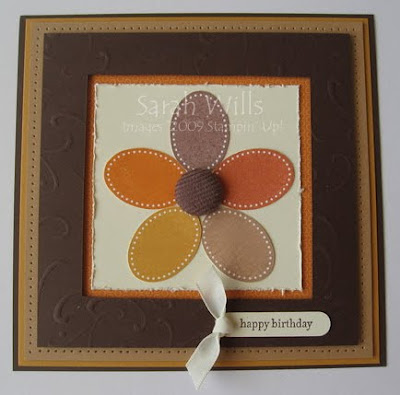 So on to something a wee bit different – as soon as I saw this set I had lots of ideas of how it could be used for other occasions – Pumpkin Patch comes with 3 stamps that you can use to make pumpkin shapes – I figured that the ovals would make great flower petals :-)
I stamped the ovals using Close to Cocoa, Creamy Caramel, Pumpkin Pie, Really Rust and More Mustard inks and cut them out, adding a Corduroy Button for the center. I adhered them to a piece of Very Vanilla that I distressed the edges of by using my scissors. I attached this to a piece of patterned orange DSP that is from a brand new pack that you can find on pg 36 in the Holiday Mini called Pawsitively Prints.
I then ran a piece of Chocolate Chip cardstock through the Big Shot using the Perfect Details Texturz Plate and cut the frame to size using my craft knife and mat – I used dimensionals to mount this over the flower image to create a framed window effect and I then mounted this onto a piece of Creamy Caramel on which I used my Paper Piercing Tool around the edge and layered it into on to two more pieces of cardstock. Finally I stamped my sentiment from Teeny Tiny Wishes (again, how versatile is this set? Love it!) and punched it out with my Word Window punch and adhered it to the card adding a piece of Very Vanilla Tafetta Ribbon for a finishing touch – and there is a card using those beautiful Fall colors :-)
I love how it turned out and thinking more about how to use those oval and circle stamps for another occasion I came up with a…
Sparkling Christmas card…
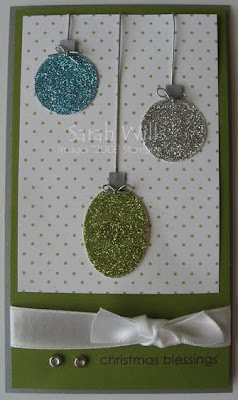 I stamped the circle and oval stamps using Versamark Ink onto White cardstock – for perfect circles, I punched them out and then stamped the Versamark onto them (punches dont like to go through glitter too much!!!) and used Heat & Stick Powder, my Heat Tool and Stampin’ Up’s fabulous fine glitters to create these very sparkly ornaments – you simply stamp your shape using Versmark, sprinkle Heat & Stick Powder on, shake off the excess and heat with your Heat Tool until it melts. Then sprinkle on glitter, shake off the excess and give it a quick heat again to make sure it is well adhered.
Hi Sarah, I love these blog hops because they introduce me to new SU bloggers. I am bookmarking your page and adding you to my blog reader. I like your fall colors flower birthday card – creative way to use the ovals and I love the colors.
See now you made want to get this set!! I love that little flower pot ThAT WOULD be an AWESOME little gift to give to my youngest son's class OH and who knew it could be used for Christmas to! Ha…
Each of your projects is just so creative!! I love the little candy-filled pumpkin card, and the pot is too cute. I also like the cards you made using the pumpkins not-as-pumpkins. Great ideas!! Thanks for sharing them with us.
Gorgeous projects! Every single one of them! But that Happy Birthday flower card is AWESOME! Nice fall colors and very creative!
While I love all your projects (thanks so much for taking the time to share!)the little flower pot has to be my favorite – it's just too stinkin' cute!
Fall is my favorite time of the year, thank you for sharing you art, you do an awesome job.
Love how you went out of the box with this one too. Those ornaments are so pretty. Thanks for sharing it with us on the hop.
I love them all! But I guess I'd have to pick the flower pot or the petal card. Thanks for all the cute ideas.
This is my first time following a "blog hop" and it is great! Thanks for all the time you spend posting ideas. I now want another set thanks to the ideas that you come up with. I have 2 fav's and they are the orange pot pumpkin and the sweet treats pumpkin in the same picture!
Thanks again for all the great ideas.
AWESOME projects, Sarah! I love them ALL! LOL! What really jumped out at me for some reason tho, was the little jack-o-lantern faces on the nugget wrappers. WAY cute!
What a fantastic blog you have. So glad I hopped onto it – I'm your newest stalker, I mean subscriber. love your projects.
Sarah, I love your cocoa holder! Adorable and great idea!
My favorite card is the Christmas card.
Kate
That pumpkin pot and treat cup pumpkin are so adorable! A great share!
Love, love, love the flower pot filled with candy corn! Too cute! I teach first grade and I think it is something we can do! =-)
This is such a fun hop. I really liked your Elegant Halloween Treats. Both the cocoa card and nugget box looked so yummy! Thanks for the chance to win your sweet blog candy.
Hi Sarah! I love the flower pot and I loved how you used the sweet treats as the center for your pumpkin. You are so creative!
Sarah – I LOVE your Hershey nuggets matchbox for hallowe'en! So cute for those teacher and coworker gifts.
Thanks for sharing!!
Jen DiMarco
Your projects are adorable! I love the faces on the nuggets!
What a cute Halloween set! I enjoyed all your projects. If I have to pick one it would be the flower pot since it is so different from other projcets I've seen with this set. Thanks for sharing! jmniffer
I loved the flower card it was SO cute and a different way to use that set!
Cute, cute, cute!
i especially like the halloween chocolate treat box for "adults"…must have something to do with the chocolate!
Your projects are awesome. Now I too want that set.
I debated on getting this set and thought it could be used for other occasions as well. I love the flower petals and Christmas ornaments. I am definately going to get it now. Thanks for the great ideas.
Hi Sarah, I love all of your projects. If I had to pick one it would have to be the pumpkin treat pot. You continue to amaze me with your creativity!!
Wow – I thought I had some great ideas for this set but these are going to be fun to try! Thank you for sharing the ideas and love the flower!!
Sarah,
I loved all your projects! My favs are the halloween projects and the fall flower birthday card is beautiful! Thanks for inviting me along on the blog hop – I am having so much fun. Thanks for sharing!
Ellen
Love the pumpkin flower pot. I love getting new ideas on how to alter flower pots. You are very talented.
Hiya Sarah. All your projects are so cute, but I really love the little nugget box with the faces. Too cute. I also love the ornaments and the oval punch flower, I'm so seeing a gingerbread man made this way.
What great blog candy too. I've never had starbucks truffles, but I am stupid over their choc. covered espresso beans, now I need to go get some. Glitter and chocolate, two of my most favoritest things in the world!! lol
Deb
Stampindebs at aol dot com
I pretty much like all the stuff in this post, but my favorite has to be the Christmas/Holiday card. I just really love glittery/sparkly cards, so that one definitely caught my eye.
I luv seeing the sample of the new products. The jelly bean sweet treat cup card is my favorite! The pumpkin works very well for the cups! Thanks for sharing your creations!
Hugz,
Sheri
I love this blog hop…so much fun! Your projects are wonderful and you are too sweet to offer up some blog candy! :o)
Wow, I never would've thought to use a Halloween pumpkin for a flower or for Christmas ornaments! Great idea!
I like how you use the pumbkin patch to create non-Halloween projects such as the ornamens and flowers. Very versatile.
Sarah… these projects are sooo FUN and clever… using the same stamp set for for pumpkins to harvest flower to ornaments…. too clever… My Fav was the kids treats… just yummy!! I've got to try those sweet center cups… flower pot…tooo cute…
Faith
I really have enjoyed looking at your blog. you have made some reall neat things.I think my favorite is the pumpkin card with the jelly beans.I do not have a blog. I am new to all this stuff. But liked looking at yours. thanks for sharing…Emily
LUVMYCATECS@YAHOO.COM
Fantastic creations Sarah! All of them are wonderful but I have to say that little flower pot is just too dang cute!
I just can't pick one of your projects….although I do kind of favor the pumpkin stamp set :)
thanks for sharing and the great blog candy.
Hi Sarah
What great cards you have done with this set and yes it is versitial
Darlene Kinnear
Thanks for sharing your awesome projects and the versatility of stamps. Congrats on your achievements!! I love the faces on the nuggets in the box the best. Me and my son are totally casing your idea for Halloween. ;)
Love all the different things you have done with this set! My favorite is the Fall petal card. Thanks for showing how to get a lot of milage out of this set.
Ad K.
pakathome@aol.com
I love what you've done with the pumpkin set!! Great use of the faces on the nuggets! Also loved the jelly bean pumkin!
TFS!
Vicky
Sarah, your nugget faces are adorable, that flower pot is too cute, but my absolute favorite is that ornament card! How fun would it be to receive that in the mail?!?!?!
I adore that pumpkin pot, Sarah! And that flower card is beautiful. Great way to show versatilty!
Hugs, Brandi
That last card is my favorite! Way to think outside the box! TFS!
I really love the card with the ovals used to make the flower – a use for this stamp set that I wouldn't have thought of by myself! Thanks for the great creations!
Susan, aka Soozie4Hom on SCS and SA
moot96 AT aol DOT com
I love the faces on the nuggets! So cute and so clever!
Sarah great job show casing this set! You did a wonderful job loved everything!
Sarah, fantastic job. And thanks so much for the alternative ideas for this set!