Today I wanted to show you a sneak peak of a brand new Stamp Set that you will be able to get for FREE during Sale-a-bration which begins on January 24th…
It is called Fresh Vintage and it features the most beautiful floral designs – and I am using a stamp from it to show you a very cool effect you can get when you stamp onto Textured Cardstock.
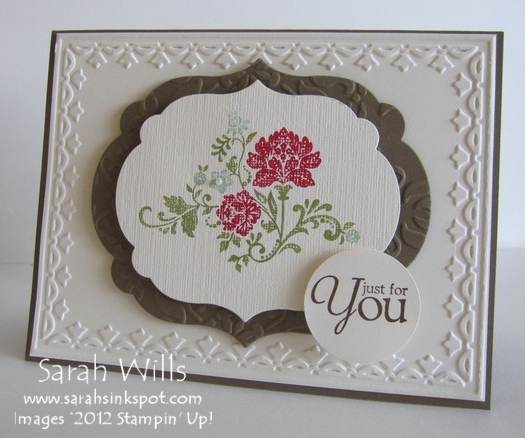
The card featured below turned out beautifully – it is a card that my Monthly Club Members will each be receiving in their January Gift Packs AND those Members of my Ink Spot Stampers Team who achieved sales targets during December will also receive a Card Kit containing all the supplies needed to make 10 of these beautiful cards with envelopes…
What do you think? I LOVE how it turned out – just so elegant looking…and do you notice something else about it? Yep – I just can’t stop using those beautiful Framelits Dies LOL – I tried oh-so-hard not to use them on this card but I just couldn’t help myself…they are just so irresistable!
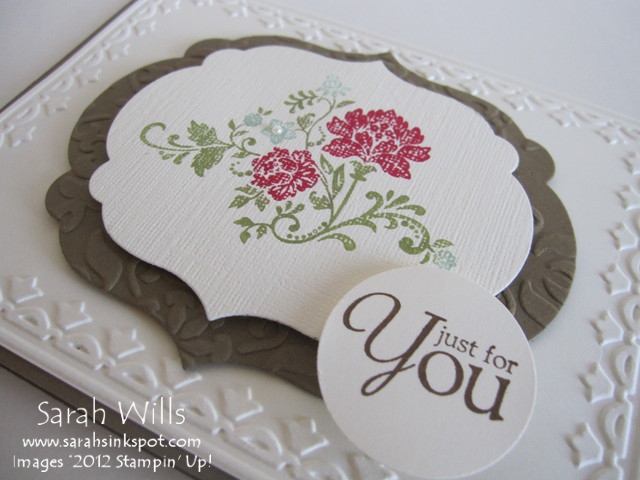
Sooo my card base is Soft Suede onto which I layered a piece of Very Vanilla – check out that gorgeous embossed frame – SO easy to do – you just run the cardstock through your Big Shot using the Framed Tulips Embossing Folder (pg 218) and voila – one gorgeous frame!
I then simply trimmed the edges down a little and adhered it to my card base. Now for the centerpiece of the card…
I used one of my Labels Collection Framelits to die cut out a piece of Soft Suede cardstock and then I textured it using my Vintage Wallpaper Embossing Folder – I added it to my card using Dimensionals.
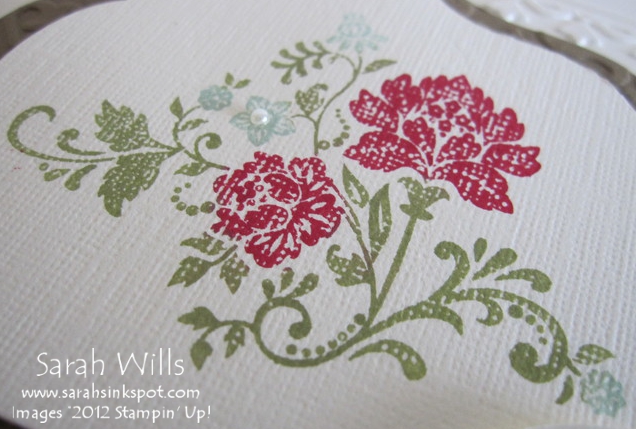
Now for my favorite bit – check out that stamped image…click on the photo below for a closer look…
Isn’t that a cool effect? It looks just like a painting on a canvas – and again, SO easy to do – I simply inked up my stamp using Markers and stamped it down onto the Textured cardstock for this amazing look – I added one cute little Pearl on a blue flower to give an added feature.
Not used Markers to color your rubber stamp before? It is very easy – I used the colors Lucky Limeade, Real Red & Pool Party – and used each Marker to color the relevant part of my stamp. Once colored in, I like to breathe on the stamp to moisten the inks and then stamp your image.
Sarah’s tip – the first time you color your rubber stamp take alot of time and care to get it fully covered – I like to think of this as ‘priming’ the rubber – and then stamp. When you have done this, I find that it is much quicker to color the stamp again to make multiple images, because there is some residual ink left on the stamp so you don’t have to be so perfect about it.
I then used a smaller Framelit in my Labels Collection to die cut out my shape and added it to my first framelit layer again using Dimensionals.
Now for my sentiment – I decided to use a stamp from the Hostess set Precious Butterflies (pg 15) and punched it out using my 1 1/4″ Circle Punch and added it to my card…
And there is one beautiful card that I hope both my Club Members & my Ink Spot Stampers enjoy…
A NOTE FOR MY CUSTOMERS – your Sale-a-bration Catalogs will be mailed out to you on Friday so be sure to keep an eye out for them – included in the envelope will be some samples for you to enjoy and a little something for you to make too…enjoy!
Sale-a-bration begins on January 24th – come back tomorrow for a sneak peak of the unbelievably gorgeous Designer Series Paper pack featured in this years Sale-a-bration Catalog – it co-ordinates perfectly with this stamp set and I guarantee you’ll want more than one pack of it!!!
CLICK HERE TO PLACE YOUR STAMPIN’ UP! ORDER ONLINE!


Love your card, the color combination and the texture very pretty
Kate
Your card is beautiful, and the flowers also look like they were embroidered….wonderful.!
actually, at first glance I thot it was counted cross stitch… very very clever
Gorgeous!! Can’t wait to get some framelits. This is really a beautiful card!