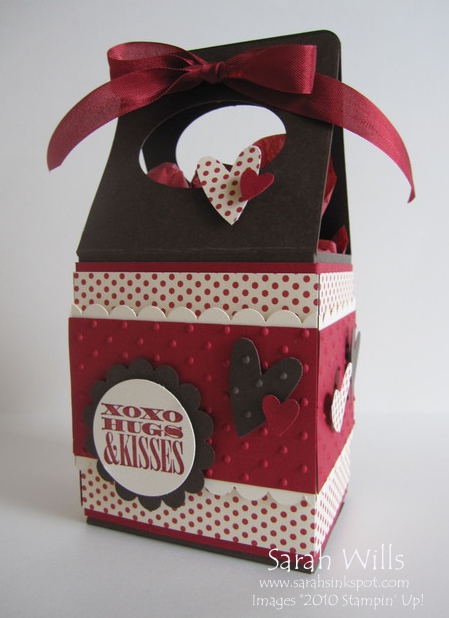
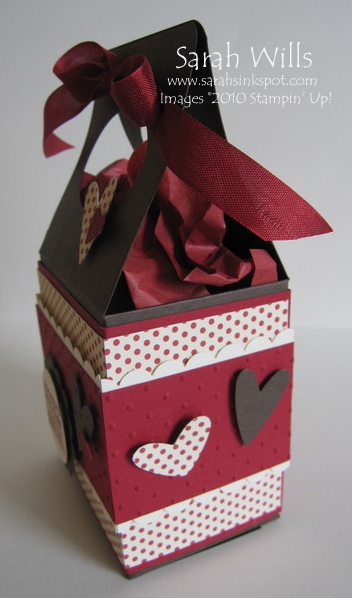
With a cute Carton style Gift Box covered in hearts, hugs and kisses!
Did you know that it is less than 2 weeks until Valentine’s Day? When I realised that I knew I needed to get my skates on and put together some treat holders!
This isn’t an original idea and I don’t remember where I saw it as I’ve had one of these boxes in my closet for a while but I just knew I had to make one to share as it is the perfect holder for Valentine treats and is fun and easy to make…no special equipment required…just a sheet of cardstock!
Please read on for details on how to make it plus a link to my free printable tutorial and this week’s blog candy…
It makes one beautiful gift box that you can theme for any occasion and is perfect for shower & party favors…the actual box section where you put the goodies measures 3″ wide, 2 1/4″ deep and 3 1/2″ high – meaning lots of room for treats!
This sweet box is made from just one piece of cardstock plus papers and embellishments to decorate it with and it is held closed by a piece of ribbon at the very top.
I chose a Valentine theme for mine and made my box using Early Espresso cardstock. For my red color I chose to use Cherry Cobbler – this is one beautiful red and the added bonus is that there is Seam Binding Ribbon available in this color too which you can find on pg 16 of the Occasions Mini Catalog…click on the photos for a larger image…
And whilst in Target this morning I happened upon a pack of valentine themed tissue paper and in it was a sheet of co-ordinating cherry red tissue which fits into my box perfectly!
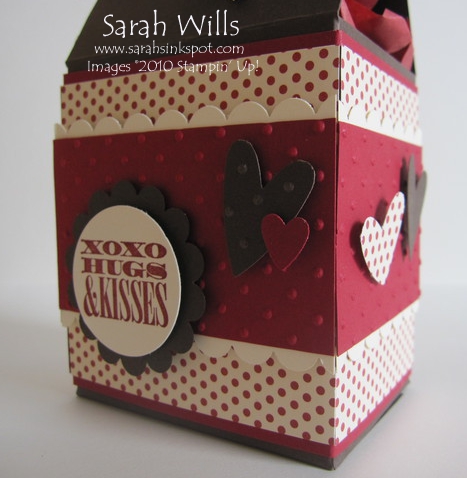
I punched my hearts using the Heart to Heart Punch and see that pretty dotted paper? From the Love Letter pack of Designer Series Paper that can be found on pg 173 of the Catalog…there are lots of gorgeous patterns in that pack!
The red strip around the center was textured using my Big Shot and Perfect Polka Dots Embossing Folder and matted onto a piece of Very Vanilla that I edged using my Scallop Edge Border Punch…
The sentiment? Stamped using a stamp from the set XOXO that you can find on pg 6 of the Occasions Mini Catalog which fits perfectly with my theme – I then punched it out using my 1 3/8″ Circle Punch and mounted it onto a punched Scallop Circle…
The handles? Made simply using my 2″ x 1 3/8″ Oval Punch – formerly known as the Wide Oval Punch – but you can of course use whatever shape you prefer…and finally the beautiful ribbon – Cherry Cobbler Seam Binding that is just a pleasure to work with.
WANT THE FREE TUTORIAL SO THAT YOU CAN MAKE YOUR OWN CARTON GIFT BOX? Click HERE to find it in my Project Tutorials section where you will find a printable version too!
You can find the stamps and Seam Binding that I used on my box in the new Occasions Mini Catalog – would you like a FREE printed copy of the new Occasions Mini Catalog? Simply click here to email me your US mailing address and I will get one out to you FAST – PLUS I’ll include a free Sale-a-bration Catalog too!
You can also view the Occasions Mini online by clicking HERE
Onto this week’s Blog Candy…leave me a comment to let me know what you think of my Carton Gift Box and you will be entered into a drawing where one lucky winner will be drawn this Friday morning…
That lucky winner will receive a kit containing everything they need to make one of these beautiful boxes plus a sampling of papers from the new pack of Springtime Vintage DSP – so be sure to come back Friday and see if you are the winner!
DON’T FORGET THAT IT’S SALE-A-BRATION! For EVERY $50 you spend on Stampin’ Up! products you get ONE ITEM OF YOUR CHOICE FOR FREE! ASK ME ABOUT IT BY CLICKING HERE!
TO ORDER YOUR STAMPIN’ UP! SUPPLIES ONLINE CLICK HERE!


What an absolutely adorable Valentine’s bag!
Thanks for the inspiration : )
La-La-Love it!
Great looking box, Sarah. It would go nicely for any occasion and looks to be an easy project. Thanks so much for sharing.
SIU (stamp it up)
Seletta
Another wonderful project! Love all the tutorials. Thanks so much for sharing them with everyone.
Janet
Thanks for sharing! this is super cute! I can’t wait to try to make one
This is absolutely gorgeous! I love the colors and design:) TFS!
Fun treat box! Ends up pretty good sized to hold lots of goodies. Love how you decorated it, I love the dots! Excuse me now, I need to go check out your tutorial which I always appreciate! Thanks for sharing!
Gorgeous Valentine box
can hardly wait to see how it is made
tfs
Adorable box. Thank you for the tutorial. I just downloaded the file.
Sarah, what a fabulous gift box for Valentine’s Day or any time to show someone you care. LOVE your choice of colors, DSP, embossing, stamps, ribbon and matching tissue. Crossing my fingers I win this kit and Springtime Vintage DSP. Have a special friend who hasn’t been feeling the greatest so this would definitely be a pick-me upper for her, filled with sugar-free candy as she’s also diabetic. Thanks for sharing your tutorials and the chance to win such great blog candy!
Super cute!
Adorable Sarah! Love the Espresso and Cherry Cobbler together. The tissue paper is perfect, what a lucky find!
Love this idea for my office buds. Thanks for the idea.
so so so cute!!! going to use this pattern for a make and take for my bible study. they’re going to make them for their kiddos. love it!
I love that this is made with one sheet of card stock! I can see it for hostess gifts or teacher gifts or…. As always, thanks for sharing all the details!! How fun that you found the matching tissue paper. Just shows how “on trend” the SU colors are.
Your Valentine box turned out wonderful! Fun size for when you want to give lots of treats or a small gift. Thanks for sharing the tutorial that is so nice of you to do. jmniffer
Thanks for deets on this project – it’s so very cute!
How cute! I’m just about in the “thinking” stage for a holder for some Valentine treats. You have come to my rescue! Off now to look at your tutorial! Thanks for sharing with us!
This is a great idea, I love it!
I love this box it is so cute. Thank you for sharing the instructions. Dianne Bell
super cute. i love it. thanks for all you do:)
Another super cute project. Thanks so much for the tutorial. Have printed it out. Can’t wait to give it a try.
Love the colors! This is too cute! Thanks for the chance to win.
Wow I love it, I bought some candy for my neighbors, as they were nice to shovel my walk several times this year. Now I have a cute box for them. Tku!