Here is one very cute Santa gift bag giving you a fun way to package some Holiday treats…simply open the flap and inside you will find a bag with plenty of room to stash lots of goodies…
Santa was very fun and easy to make – it would be a great way to package gifts for kids, teachers, neighbors, friends…

He is pretty roomy inside and this is what I am filling mine with – peppermint sticks along with a holiday themed hand lotion & hand sanitizer that I found at Bath & Body Works…

Santa is made from just one sheet of 12×12 cardstock and all the pieces used to decorate him were made using punches…here is my tutorial so that you can make your own – at the end of this tutorial you will find a printable version and template with measurements so that you can print them out and keep it for reference.
Take a sheet of 12×12 cardstock in the color of your choice…

Cut to be 12 x 7 3/4″…put this into your score tool or paper trimmer with score blade inserted, with the short edge along the top and score in at 1 3/4″…this will be your bottom edge…

Then turn your cardstock around so that the longest edge is at the top and score at 1 3/4″, 5 3/4″, 7 1/2″ and 11 1/2″…

Cut along the score lines from the bottom edge up until you meet the intersecting score line – these cuts will make your bottom flaps…trip away the little section on the end and make diagonal cuts so that the flap folds in easily… If you wish to stamp on your bag base, do that now before you assemble it…

Apply a strong adhesive such as sticky strip to bottom flaps and the little flap on the end…

And fold your box up and adhere in place…

Gently push the front and back together at the top to create slight Vs each side…and your base is complete.

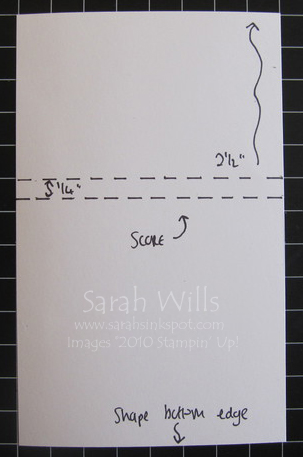
Now to make the top flap – cut a piece of cardstock to be 4″ x 6 1/2″… For Santa I used Textured Pink Pirouette cardstock to give him a flesh color…

Put into your score tool or paper trimmer with score blade inserted and the longest edge along the top – score at 2 1/2″ in from one end and again 1/4″ over from that score line…

Using your Circle Scissors Plus or any round object you can draw around such as a plate, shape the end of the longer part of the cardstock and cut to size… If you want to texture or stamp on your flap do this now before you adhere it to the bag base.

Fold along the score lines and apply Sticky Strip to the inside of the rectangular piece…

And adhere to the back of your bag…

And here is your finished flap attached to the bag base…

I use magnetic closures to close my bags – you can find these at craft & scrapbook stores – and you could also use sticky-backed velcro that you can find in big box stores…the beauty of both of these types of fasteners is that they can be opened & closed many times…here is my bag all closed up and ready to be decorated…

How to make him look like Santa…

I used a variety of Punches and a Bigz Die – to glue them in place, I used Mini Glue Dots and Dimensionals as follows…

Beard – I used Textured White cardstock and die cut a scallop circle using my Big Shot and the Bigz Scallop Circle Die (pg 207) – calculate how big you want your beard to be and cut to size – use the Scallop Edge Border Punch (pg 200) to shape the top and adhered it to your flap using Dimensionals
Hat – Cut a piece of Real Red cardstock to be 4 1/2″ x 4 1/2″. To make a triange shape, at the top edge make a pencil mark in the center – at 2 1/4″ in from the edge. Draw a line from this center point down to one bottom corner and repeat for the other side – cut along these two lines and you will have your triangle hat shape.
Pom Pom – I used the Boho Blossoms Punch (pg 200)
Hat ‘Fur’ Trim – Cut a piece of White cardstock to be 1 1/4″ x 5″ – trim each long edge using the Scallop Edge Border Punch (pg 200) and round off each end – adhere to the hat using Dimensionals
Mouth – I used the 1 3/4″ x 7/8″ Oval Large Punch (pg 202) and Real Red cardstock
Eyes – I used the following Circle Punches – 1″ and 3/4″ and 1/2″ – you can find all these on pg 202 and punched circles out of Whisper White, Basic Black and Marina Mist cardstocks – I adhered them using Dimensionals
Nose – I used 1/4″ Circle Punch and Regal Rose cardstock and adhered it with a Dimensional
Cheeks – I used 3/4″ Circle Punch and Pretty in Pink cardstock
Belt – cut a piece of Black cardstock to be 1″ x 7 1/2″ and score at 1 3/4″ from each end – fold and adhere to Santa. I used two Square Punches to make my buckle out of Brushed Silver cardstock – use the smaller punch to punch out a square and discard that square – then take your larger square punch and position it over the square hole you made in the cardstock and punch out again – you will have punched out a square frame that you can use as the buckle.
WANT TO PRINT OUT THIS TUTORIAL? PLEASE CLICK HERE FOR A PRINTABLE VERSION WHICH WILL OPEN IN A NEW BROWSER WINDOW
Please click HERE to view my other Project Tutorials
Templates with measurements…

