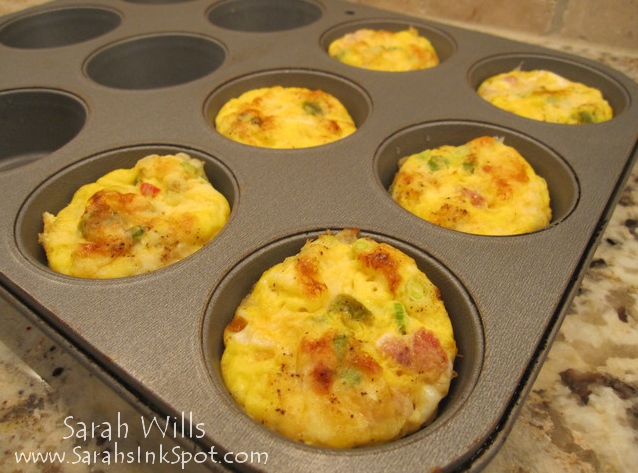
I was making some yummy make-ahead Breakfast Omelette Muffins the other evening which gave me a great idea for making a card with a little extra something tucked into it…
This card features a pocket into which you can tuck a card to hold a recipe or special message and it simply slides right out by pulling on a tab…this would be a great way to share your homemade recipes when you take food to a new neighbor, new parents, a holiday gathering or any event – you can easily theme your card to suit the occasion!
Full instructions on how I made it are below including a link to my free printable step-by-step tutorial!
Here is my Pull-out Recipe Card…see that little green tab on the side?
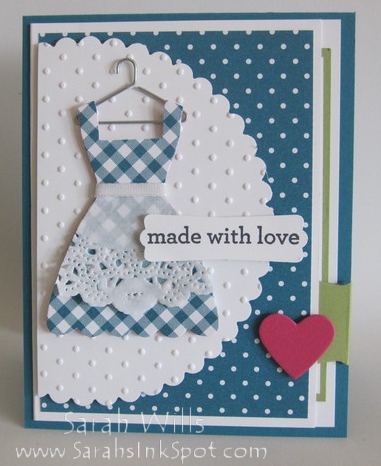
You simply pull on it and voila! The recipe card pops right out…
The card base…is Island Indigo onto which I attached a pocket made of Whisper White card stock…
The polka dots…I wanted to create a whimsical kitchen kind of look and decided to go with some polka dots for my background – I found the perfect patterned paper in Regals Designer Series Paper Stack…
The polka dotted scalloped circle…I wanted a plain but not too plain backdrop for my dress and so I decided to go with a piece of White card stock that I textured using the Perfect Polka Dots Embossing Folder (see how I continued the polka dot theme there too?) – this lets the dress shine but has some dimension and continuity with the base…
I then used the largest die from Circles Collection Framelits (pg 186 – and plus which happens to be scalloped) to cut out my shape and trimmed it to the size I wanted for my card…
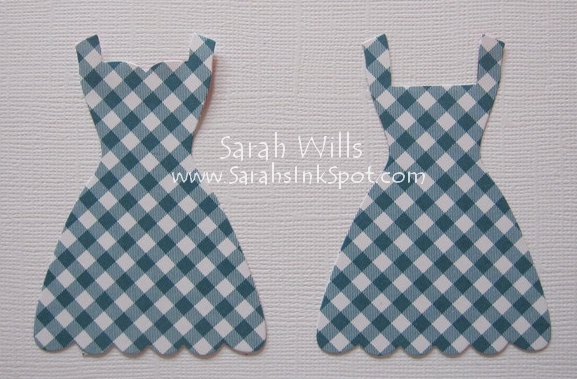
The dress...isn’t it cute?! So easy to make using a die from Dress Up Framelits and a piece of gingham patterned paper from Gingham Garden DSP…
You will notice that my dress is a different shape from the die that I used to cut it… I simply die cut my dress and took my paper snips to it to trim off a section at the top to give a plainer square neck dress as you can see below – the one of the left is the original die cut shape – I then shaped that top bit to give a very different look as you can see in the dress on the right – making this set of dies even more versatile!
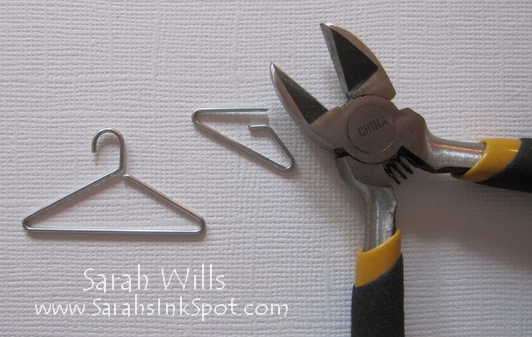
The hanger…is from Hung Up Cute Clips – I decided that I wanted a plain hanger and didn’t want all the paper clip inner part and so simply cut it away using some wire snips to give me a regular hanger shape…
The apron…is simply a doily from Tea Lace Paper Doilies that I shaped using that same dress die to give me a perfect fit…
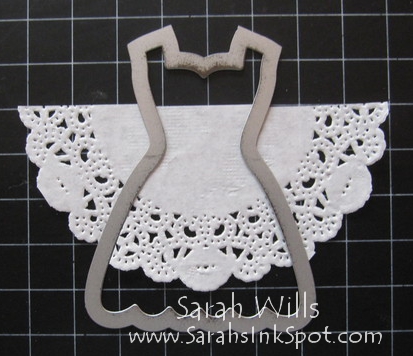
I then added a little bit of Whisper White 3/8″ Taffeta Ribbon across the center for the apron band.
The ‘made with love’ sentiment…is a stamp from Kind & Cozy that I punched out using the Modern Label Punch…
The finishing touch…is a little heart that I made using Melon Mambo card stock and a small heart shaped die from Circle Card Thinlits…
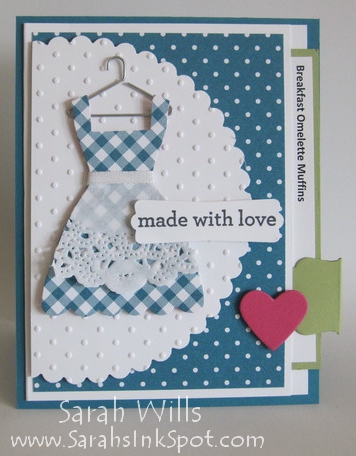
And for the pull-out recipe card…as you can see it simply slides right out of the side and when you put a tab on the edge, it makes is so much easier to do this…

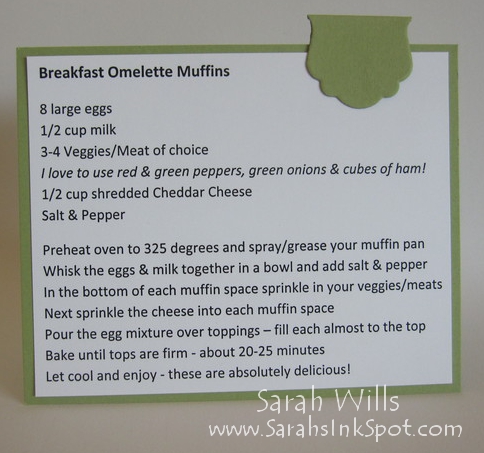
The recipe card base…is Pear Pizzazz card stock onto which I layered a piece of Whisper White that holds my recipe – I chose to print this out before trimming it to size but if you prefer, you can hand write on it instead…I would love to, but my hand writing is not awesome and so I prefer the printed word!
The tab…many punches & dies would make perfect tabs but as I had the set out, I decided to use another die from Circle Card Thinlits to make my shape – I die cut it and simply scored it in the center, folded it over and used strong tape to wrap it each side of my recipe card.
WANT A FREE PRINTABLE TUTORIAL SHOWING YOU STEP BY STEP HOW TO MAKE THIS RECIPE CARD SET? Click HERE to find it!
Supplies used to make this card:
Cardstock: Island Indigo (122923), Whisper White (100730), Melon Mambo (115320)
Stamps: Kind & Cozy (CM 129126/WM 129123/MDS 134854)
Ink: Basic Black (126980)
Designer Series Paper: Gingham Garden (129310), Regals Designer Series Paper Stack (130139))
Die Cutting: Circle Card Thinlits (133480), Circles Collection Framelits (130911), Dress Up Framelits (130101)
Texturing: Perfect Polka Dots Embossing Folder (117335)
Punch: Modern Label (119849)
Ribbon: Whisper White 3/8″ Taffeta (109070)
Misc: Tea Lace Paper Doilies (129399), Hung Up Cute Clips (129389), Dimensionals (104430)
Now those Breakfast Omelette Muffins are DELICIOUS and the recipe is below…you can make them ahead of time and they keep great in the fridge for 2-3 days and you can also freeze them too for super easy grab & go pieces of breakfast heaven…as you can see from the photo below, they don’t hang around long enough in my house to get as far as the freezer!!!
Make ahead Breakfast Omelette Muffins
Ingredients:
8 large eggs
1/2 cup milk
3-4 Veggies/Meat of choice – I love to use red & green peppers, green onions & cubes of ham
1/2 cup shredded Cheddar Cheese
Salt & Pepper to taste
Directions:
- Preheat oven to 325 degrees and spray/grease your muffin pan (don’t use paper muffin liners because they will stick to your muffins!)
- Place the eggs and milk together in a large bowl and give them a quick whisk to mix them well and then add a pinch of salt and pepper
- Into the bottom of each muffin space sprinkle in your veggie/meat toppings – the toppings will not stay at the bottom – whilst the muffins cook, they become evenly distributed throughout each muffin
- (If you are using breakfast meats such as sausage & bacon, pre-cook them and dry them using paper towels to get rid of as much moisture as you can)
- Next sprinkle the cheese into each muffin space – just a small sprinkle into each is enough – it is amazing how much taste this small amount gives!
- And then pour the egg mixture over all the toppings, almost filled to the top – I like to put my muffin pan onto a baking sheet just in case of spillage
- Bake until tops are firm. About 20-25 minutes – if you want the tops to have a more golden brown appearance, pop them under the broiler for a minute
- Let cool and enjoy – these are delicious!
WANT A PRINTABLE VERSION OF THIS RECIPE SO THAT YOU CAN PRINT IT OUT AND KEEP IT? Click HERE to find it!
CLICK HERE TO ORDER YOUR STAMPIN’ UP! SUPPLIES ONLINE!

This is absolutely ADORABLE…
How creative! The person who receives the card will appreciate it. Never thought of adding a recipe. I think I will make one of the for my daughter when she asks for another recipe!
Wonderful!
would like to order the die cut for dress, and the supply for the hanger.
where can I order?
Just saw this card on Pinterest. I love it, such a great idea! Your recipe sounds delish too, must try it. Thanks for the tutorial