I am in the process of thinking about end of year teacher gifts (it’s only 7 weeks away for us – yikes!!!) and wanted to make an extra something for a very special volunteer gardener – Bonnie Martin – who devotes a lot of time to our school garden…
Back in 2009 – she planned, got funding for and implemented – a fabulous school garden complete with outdoor classroom, vegetable garden, herb wheel and native garden…this is where our children get a hands on go at growing, eating what they grow, learning about bugs, what plants need to grow, and about plants that require very little water – so important for our future Texas gardeners to learn!
I put together a Free Printable Tutorial showing you step-by-step how to make this project in case you want to make one of your own – find the link to it in the post below!
She is utterly fabulous and a true inspiration and so I decided to make a little gift to give to her at the end of the school year…and here it is…

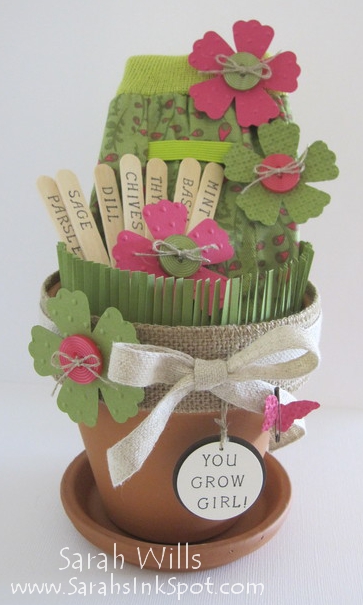
Isn’t that cute? I am so delighted with how this turned out! This is another fun & easy project to make and again, very cost effective…simply a terracotta pot that she can use, filled with gardening gloves, seed marking sticks and cute embellies!
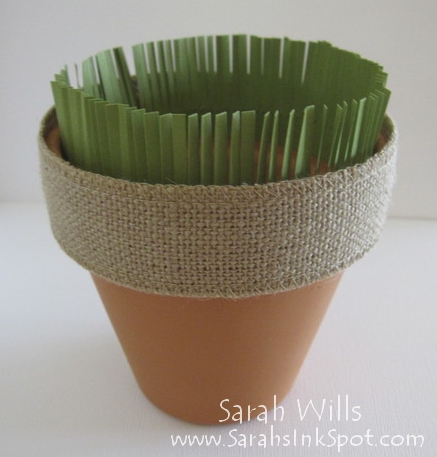
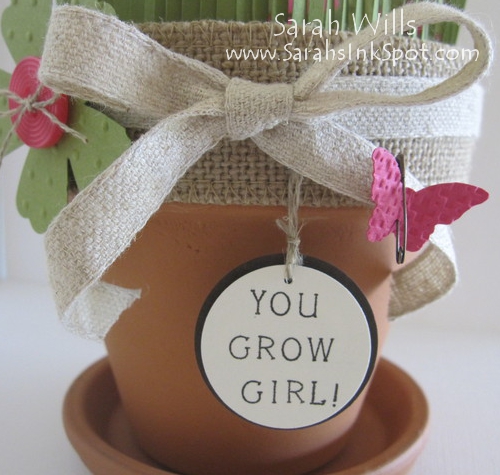
The flower pot…is simply a plain terracotta 4″ pot with a saucer – together they cost under $2 which is a fab price! I then wrapped around a piece of 1 1/4″ Burlap Ribbon (pg 37 Occasions Catalog) and on top of that I tied around a piece of 7/16″ Natural Trim Ribbon (pg 173) and finished with a bow in front…
The grass…is simply a strip of Old Olive cardstock that I fringed using my fabulous Fringe Scissors (pg 31 Occasions Catalog) and which I then secured inside the rim…now that is a neat look even without any embellies!!! Check out how great this looks with just the burlap and grass…this is a base you could use for so many projects!
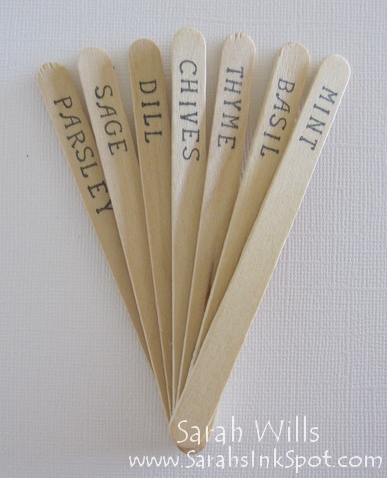
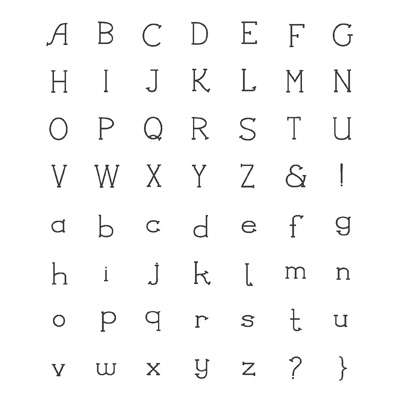
The seed stick markers…I took a bunch of popsicle/craft sticks that you can find in big box & craft stores and a super cute alphabet set called Simply Serif Mini Alphabet (pg 132) and got to work making my custom seed stick markers. I used Jet Black Stazon Ink for it’s waterproof factor but to be extra safe, I also applied a layer of sealant to lock in those letters…
I chose to use herb names for my sticks but you can customize sticks to reflect your gardener’s favorite plants…
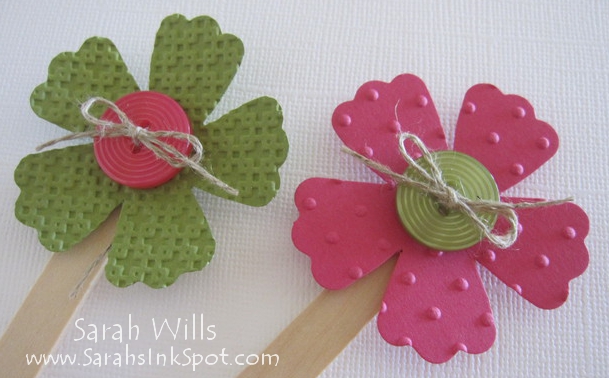
Those beautiful flowers…I wanted to incorporate the gardening gloves into my color scheme and so choose Old Olive for the green and Melon Mambo for the pink. The flower shape that I chose to use can be found on the Fun Flowers Bigz L Die (pg 192) and I die cut my flowers using it.
I wanted some texture to those flowers and so I used two different Embossing Folders to do this – Perfect Polka Dots for the pink flowers and Square Lattice (pg 191) for the green flowers – and I then added a bright button to the center of each – both colors can be found in Brights Designer Buttons (pg 168) – through which I tied a bow using Linen Thread (pg 173).
If you prefer, you could attach your flowers to sticks like this…
Or keep them loose…I popped my gardening gloves into the pot, added those seed sticks and decided to dot my flowers around, using Dimensionals to hold them in place directly onto gloves, sticks & ribbon…click on the photo below for a closer look…
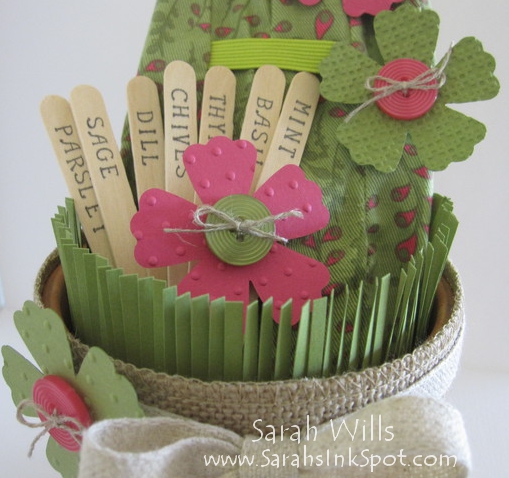
The tag…I decided to make a custom tag, again using stamps from Simply Serif Mini Alphabet, and decided on the phrase ‘You Grow Girl!’ – isn’t that fun?
I stamped it using Early Espresso Ink and punched it out using the 1″ Circle Punch (pg 182) – I then layered it onto a circle of Early Espresso cardstock that I created using the 1 3/8″ Circle Punch (pg 182), put in a small hole and tied it to the ribbon on the rim using a piece of Linen Thread.
The finishing touch…I wanted to add a little something extra and decided on a cute little butterfly that I made using the Bitty Butterfly Punch (pg 183) – I textured my butterfly using the Square Lattice Embossing Folder and then attached her to my ribbon using a small pewter colored safety pin from Vintage Trinkets (pg 170)…click on the photo below for a closer look…
I absolutely LOVE how this project turned out! I will also give Bonnie packets of the co-ordinating herb seeds to make a gift that she can instantly use – I love giving practical things!
WANT TO MAKE YOUR OWN FLOWER POT WITH SEED STICKS GIFT? I have a FREE Printable Tutorial that you can find by clicking HERE! You will find measurements & step-by-step instructions with photos so that you can easily create one of your own!
Here are the images you get in that set Simply Serif Mini Alphabet – it is a bargain set of 56 stamps that contains BOTH uppercase & lower case letters…click on the blue words to find it in the online store…
- 126360 Simply Serif Mini Alphabet – $20.95
Supplies I used to make this project:
Stamps: Simply Serif Mini Alphabet Stamp Set (126360)
Ink: Jet Black Stazon (101406)
Cardstocks: Old Olive (100702), Melon Mambo (115320)
Ribbon: 1 1/4″ Burlap (132140), 7/16″ Natural Trim Ribbon (129287)
Scissors: Fringe Scissors (133325)
Die Cutting: Fun Flowers Bigz L Die (121812), Big Shot (113439)
Texturing: Square Lattice EF (119976), Perfect Polka Dots Embossing Folder (117335)
Punches: 1″ Circle (119868), 1 3/8″ Circle (119860), Bitty Butterfly (129406)
Misc: Linen Thread (104199), Dimensionals (104430), Vintage Trinkets (118764), 4″ Terracotta Pot & Saucer, Popsicle/Craft Sticks, sealant
CLICK HERE TO ORDER YOUR STAMPIN’ UP! SUPPLIES ONLINE!
Just in case you want to virtually visit our super cool school garden, you can find the Riverplace Titan Garden facebook page by clicking here
And a cute video showing installation day here – it is a gem of a learning opportunity and the kids LOVE it along with Miss Bonnie – thank you Bonnie for all that you do – we truly appreciate you!
Adorable gift – so clever! The garden is marvelous! I especially liked the gourd tunnel – what fun!!
Oh this is absolutely fabulous Sarah…. Thanks for your inspiration as always….
What a cute project! Thanks so much for the tutorial!
What a great and imaginative project! Thanks for breaking it down for us.