In a beautiful little scrapbook album made simply from 5 Envelopes and a piece of card stock – decorate as wished, add photos and you have one cute and very affordable-to-make keepsake…
You have the front and back covers to decorate with patterned papers and embellishments PLUS there are 10 pages inside too…and you also have 5 pockets into which you can slide more pages or mementos of a trip…
Please read on for details on how I made it plus a link to my free tutorial and this week’s blog candy…
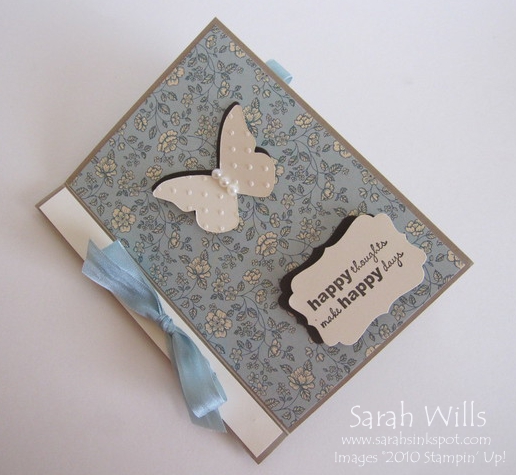
Here is the front cover…
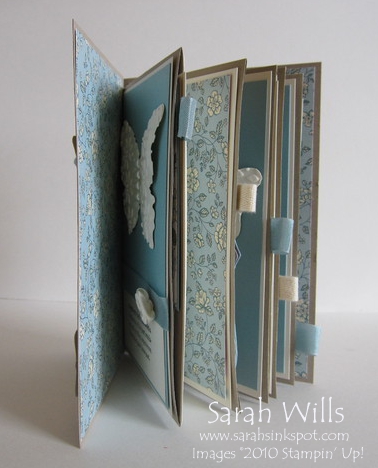
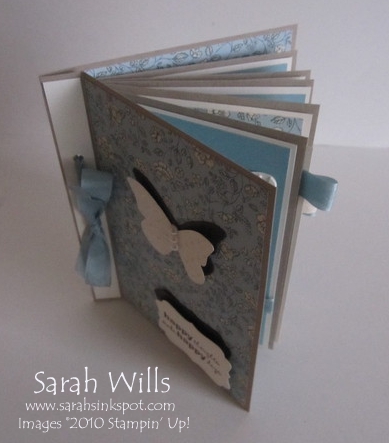
But you can’t really get a good look at what it really looks like from that, so here is a side view showing you the pages and tabs that you use to pull out the 5 inserts…
Isn’t it cute? I used patterned papers from Springtime Vintage DSP that you can find on pg 15 of the Occasions Mini Catalog to decorate my covers & pages and bound it using the new beautiful Baja Breeze Seam Binding featured on pg 16.
The envelopes that I used to make the pages are Medium Crumb Cake Envelopes and they double up as pockets to hold mementos of trips or events such as a program or a ticket…but I decided to slide 5 more pages into mine and made ribbon tabs so that they can be pulled out easily – I used Seam Binding and Twill Tape and taped on a ribbon loop underneath my decorative papers so that the ends are hidden from view…
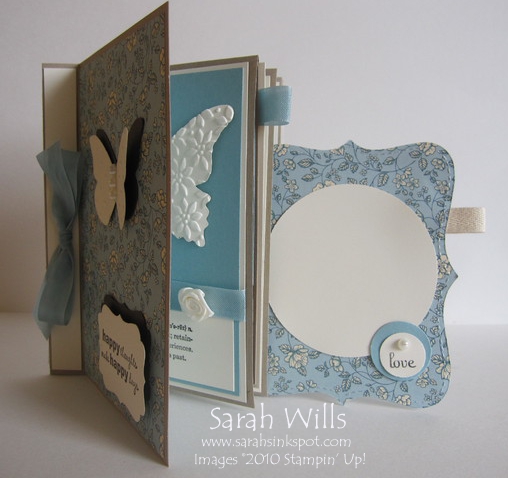
Two of my sliding inserts were made using the Top Note Die – this is one of them…
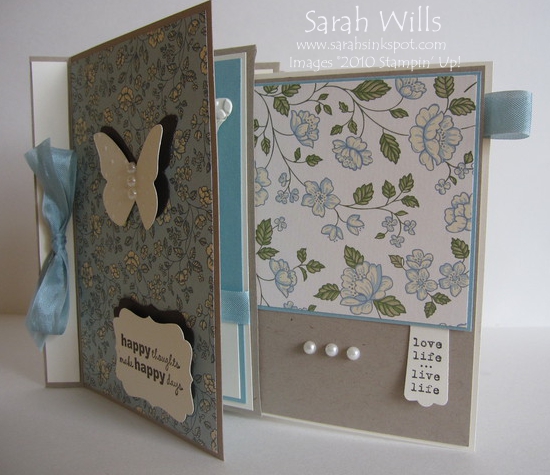
And the other three are rectangular pages like this one…again, it is decorated using beautiful paper from Springtime Vintage…love those patterns…
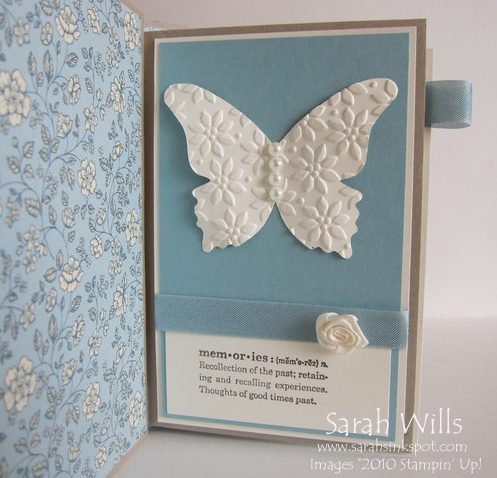
And I used lots of little embellishments on my pages too including Pearls, stamped Sentiments, the new Vanilla Ribbon Rosettes, various punched shapes and made butterflies using my Big Shot and Beautiful Butterflies Die – I added texture to these butterflies using various Embossing Folders which gives them a really beautiful look, as you can see from my first page below…
I am delighted with how my album came out and now I just need to add photos…
WANT THE TUTORIAL SO THAT YOU CAN MAKE YOUR OWN ENVELOPE SCRAPBOOK ALBUM? Click HERE to find it in my Project Tutorials section where you will find a printable version too!
Onto this week’s Blog Candy…leave me a comment to let me know what you think of my album and you will be entered into a drawing where one lucky winner will be drawn this Friday morning…
That lucky winner will receive a kit containing envelopes, cardstock, ribbon and patterned papers – everything they need to make one of these cute albums – so be sure to come back Friday and see if you are the winner!
Want a FREE printed copy of the new Occasions Mini Catalog? Simply click here to email me your US mailing address and I will get one out to you FAST – PLUS I’ll include a free Sale-a-bration Catalog too!
You can also view the Occasions Mini online by clicking HERE
TO ORDER YOUR STAMPIN’ UP! SUPPLIES ONLINE CLICK HERE!
Sarah,
How adorable and functional, what a great little gift for a new grandparent or parent for that matter. Those first cute pics would be stunning in it.
Thanks for you work and sharing,those of us that need inspiration and help with ideas appreciate you.
SIT, (Stamp It UP)
Seletta
This is absolutely darling! I can see so many uses for it – a holiday album, a vacation album, a graduation album. Thanks for sharing!
Very pretty. Love your embellishing and pull-outs. Thanks for the tutorial and blog candy chance.
This is so neat! I love the colors! I gotta keep this short as I wasnt to go check out your directions to see if I can really do this before I get too excited over it! I have a friend who is going on a cruise through the Panama Canal and this would be so much fun for her – rather than just scrap book pages which she says she will also make but rarely gets them done. Also, a good excuse for me to get that butterfly stuff! I hadn’t really noticed that paper either! The rosettes I just ordered so I am well on my way! Thanks for sharing such a fun project.
Oh My Gosh! i love love love this:)
my fingers and toes are double crossed!!!
This is such a pretty and well-done album. I love the elegance of the DSP. Thank you for sharing and for the blog candy opportunity.
That album is adorable!! Design, colours, layout – everything!
Hi Sarah! I just discovered your blog and love it! You have some amazing ideas and tutorials. Can’t wait to try this scrapbook as well as the pincushion jar. Thanks for sharing your creativity!
It is very cute! Thanks for posting the tutorial!
It turned out so pretty and I really like the colors
The idea of having a place to put ticket stubs, receipts, and all of those great extras from vacation is just what most of us need. Great project!!!
Wow this is gorgeous. You are so creative and so generous to share your wonderful project and tutorials with us. I love the colours and the butterflies. Now that I’ve seen this DP “in action” I will have to get some for myself.
I’ve always loved envelope albums and have been keen to make one myself. You’ve taken it to a whole new level with this one. Gorgeous.
I love the paper and all the extra detail of the seam binding, embellishments and best of all, the shaped sliding inserts with the ribbon tabs.
Thanks for your generosity in sharing the tutorial. Can’t wait to try it out.
I just recently discovered your blog and after seeing this stunning keepsake, I am SOOOO glad I did! This is just beautiful. I can’t wait to try one on my own. That designer paper just made its way to the top of my “gotta have it” list. Thanks for sharing your tutorial. I love when creative artists are willing to share with the rest of us!!
I love this!!! Thanks so much for providing the instructions. I am going to try to make one, too. :)
Nancy
smithr66 on SCS
Beautiful album!
I love the colors and elegant design.
Gretings from slovenia, Marika
What a beautiful album! I love the design and the colors that you chose. Thanks too for sharing the how-to instructions!
What a cute little scrapbook. No one would guess that it is made from envelopes. I sure hope I can do this as I have some Christmas pictures that would look good in this.
This is a great album! I like the colors you chose and how there are many places to put pictures and notes on. Thanks for sharing!
This is gorgeous Sarah! So beautifully done. Love that paper.
This album is adorable! I’m always looking for something different to make with my Stampin’ Up! papers and embelishments! Thanks for sharing for the opportunity to win the supplies to make one!
Beautiful album, Sarah! Maybe I’ll make one and combine it with some homemade coupons for my sweetie for Valentine’s day. Hmmm…..
Thanks for the inspiration!
What a lovely album that could be used for any occasion! It is gorgeous! Thanks for sharing your awesome creations with us everyday! I truly appreciate all you do on your blog! For me, it is very helpful and inspiring as well! Again, THANK YOU!!!
LOVE your album ~ embellishments and all. What an awesome gift this would make for so many different occasions. Have some friends who will be celebrating their 50th wedding anniversary and can see one of these as an awesome gift showcasing their closest friends, siblings, children & grandchildren. Would love to win ~ thanks for such awesome blog candy and as always, your fabulous tutorial.
You are AMAZING…not only are your projects darling, creative and innovative…your directions are easy to follow. Thank you so much for doing this amount of work so that others can enjoy creating such wonderful things.
WOW! This is a beautiful booklet. I love the colors, style and versatility. This is a wonderful work of art and functionality!!! I am hoping my name will be picked for blog candy!!
Sarah, this is so wonderful! The butterflies are so spectacular with this paper! Thanks for your continued generosity of talent and ideas.
I love this album…Very elegant! All your embellishments really make it pop!
Wow Sarah, this is absolutely gorgeous — I would love to win the package to make my own. This is the first time I have been to your blog (sorry). I got the link from the picture in the Stampin’ Addicts newsletter. So adorable for a gift or for yourself. Thanks for offering blog candy and to be honest, I hope I get picked — LOL!!
Sandi Dailey
gdailey@concentric.net
Just gorgeous!!!! Love the color combination and how elegant this looks! Thanks for the chance to win!!!!
I luv it, and if I don’t win I want to buy it.
Thanks for sharing!
Hi, I recently found your blog. I was looking for a 3d WOW, so I tried out your floppy scrapbook tutorial. It was so well-written and easy to follow. My fellow sidelines loved it.
I love your Vintage envelope album too. Its so beautiful and springy. I hope I win it! If not, I will have to make one of my own!
Thanks so much for sharing your talents and creativity w/ us!
Love it! You make things look so easy.
Thanks for sharing such wonderful/cute ideas.
Just love this little scrapbook. A lady at work is leaving and I think this would be a great little gift to give her. Thanks so much for all wonderful ideas you share.
This is fantastic. I can see this idea being used with the inserts being used for each month of a birthday calendar. Thanks heaps for the inspiration AND the wonderful tutorial.
I love this project. Can’t wait to try it. It’s less intimidating than a complete albumn. Thanks for sharing.
I love this project. Can’t wait to try it. It’s less intimidating than a complete albumn. I love your paper choices.Thanks for sharing.
Thanks so much for providing free instructions -its so lovely that you are willing to share how you made your creations.