Yesterday’s blue and brown card to create a matching Thank You card & gift combo!
I loved using blue and brown so much yesterday that when it came time to decorate my Long Nugget Box that I made for my tutorial today, I decided to use those colors again to decorate it to use with my card from yesterday to create a matching gift set…
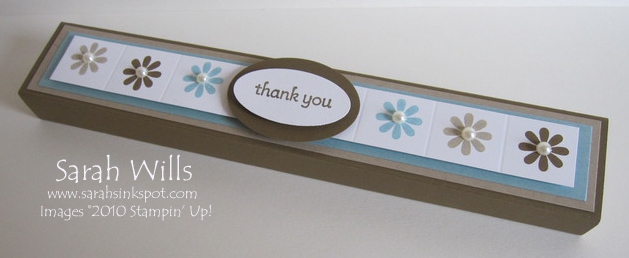
My box today is fun and easy to put together and is very economical to make – you simply need two sheets of cardstock and embellishments & papers to decorate it – plus 9 Hershey Nuggets to fit inside…
Please read on for details on how to make it plus a link to my free printable tutorial and this week’s blog candy…

Above you can see it slightly open – the drawer slides out to reveal those delicious chocolates inside…my slide out drawer was made of Crumb Cake card stock and my outer sleeve uses Early Espresso – the two fit together perfectly…click on any photo to view a larger version…
Just like yesterday, I used the bargain stamp set Bold Blossom featured on pg 31 of the Occasions Mini Catalog to stamp my flowers and this time I used some Pearls for the flower centers – large pearls on the outer sleeve and small pearls on my Nugget flowers.
You get an assortment of 150 pearls in the Basic Pearls package featured on pg 188 of the Catalog for just $4.95 – and they already have glue dots attached making using them super easy to use – simply pull off and stick in place!
You will notice that I only used a portion of the ‘thank you’ sentiment on my box – it is the same stamp as I used yesterday but to use just those two words I simply colored them with a Marker and stamped…easy!
This is what the drawer looks like fully out – it can hold 9 Hershey’s Nuggets or you could stack Hershey Miniatures in there if you prefer…it’s a perfect fit…

Like those Nugget wrappers? There are two easy ways to jazz up Nuggets and co-ordinate them with your project:
- the first way is to cover them with strips of patterned papers – cut papers to be 1″ x 3 1/4″ and use a strong tape such as Sticky Strip to adhere in place
- the second way is to use Avery labels – you need to use labels sized 1″ x 2 5/8″ ( product no. 8860) and can find these in the stationery aisle of grocery & big box stores – stamp your desired image onto each label and then simply peel off & wrap around your Nuggets – as you can see below, it’s a very quick and easy way to personalise chocolates…

This box is very sturdy, can be themed for any occasion and I love how it turned out…here it is complete with my card from yesterday – what a great little thank you gift!

WANT MY FREE TUTORIAL SO THAT YOU CAN MAKE YOUR OWN LONG NUGGET BOX? Click HERE to find it in my Project Tutorials section where you will find a printable version too!
Onto this week’s Blog Candy…leave me a comment to let me know what you think of my Long Nugget Box and you will be entered into a drawing where one lucky winner will be drawn this Thursday evening…a day early since I am in a blog hop this weekend that begins on Friday!
That lucky winner will receive a kit to make one of these boxes plus a set of 5 hand-stamped note cards made by myself – so be sure to come back Thursday and see if you are the winner!
Stamping on a budget? The stamp set that I used for these projects – Bold Blossom – costs just $9.95 for the Clear Mount or $12.95 for the Wood Mount version – you can find it on pg 31 of the Occasions Mini Catalog and here are the images included in that set:

It is one of my favorite sets in this Mini Catalog and is featured in my card tomorrow along with a special offer so be sure to come back and see what that’s all about…
Want a printed copy of the new Occasions Mini Catalog? Simply click here to email me your US mailing address and I will get one out to you FAST – PLUS I’ll include a Sale-a-bration Catalog too!
You can also view the Occasions Mini online by clicking HERE
Sarah – just love it! I have never made a nugget box and just love your long version of it! Can’t wait to try it! Thanks for sharing your inspirations with us and a special thank you for posting tutorials!
So very cute and practical for a hostess Thank-You.
Thanks for creating and sharing. Like the idea of covering the nuggets with labels, makes the going a little quicker.
SIU,
I like how it is coordinated with the card yesterday. Good idea!
I love the tutorials you have provided on your blog, and the long nugget box is yet another winner. I really appreciate you sharing your talents with your blog fans and would be thrilled to win the blog candy.
Oooh, nine Nuggets! Extra yummy! The box and card are so pretty. Looks like tile.
such a beautiful nugget box! How clever to use Avery labels!
I like the simple design.
Love your long nugget box with coordinated card. Awesome details. Great tips for wrapping nuggets and appreciate your Tuesday tutorial. How fun to give friends as a simple little gesture. Thanks for another chance to win blog candy!
I have become addicted to your posts. I LOVE THIS ONE. I have a candle business so you have my creative thoughts going crazy right now. Thank you so much for all of the GREAT ideas. I really like how you use simple everyday things.
I love the fresh,clean look and function of the long box..can’t wait to try one. Blue and brown..co cool! Keep up the inspiring posts!
Hi Sarah!
I have just recently discovered your blog and I am in love with all your wonderful projects!! Thank you so much for providing us with well-written tutorials too, that is so extra helpful to me! I would love a chance to win a kit to make the nugget box–how fun!
June in KS
I love this nugget box and matching card. What a nice teacher gift to give. I enjoy your blog and your wonderful tutorials. Thanks for your wonderful ideas!
I love these colors you used & also the nugget box is just adorable!
This nugget box and thank you card are wonderful. How easy to do for those little gifts we all have to give. I so enjoy your tutorials. You are very creative!
This is terriffic!! Has given me lots of ideas for easter presents! :D